Category: Crypto Trends

Make sense of the news and how it affects the blockchain space as a whole. Crypto trends is a collection of relevant news and insights to help you make an informed decision.

  • Yaka Finance ($YAKA) token airdrop guide: Fairest airdrop!

    Yaka Finance ($YAKA) token airdrop guide: Fairest airdrop!

    Yaka Finance ($YAKA) is the native liquidity engine of Sei Network. They have already confirmed details of their airdrops (yes, multiple airdrops!). Most importantly, from our research, it is going to be a fair token allocation to all community members! Here is our Yaka Finance ($YAKA) token airdrop guide.

    Learn more about the Sei Network token airdrop HERE

    Check out our Yaka Finance ($YAKA) token airdrop guide

    Yaka Finance v2 Testnet Airdrop (1 DAY LEFT)!

    What is Yaka Finance ($YAKA)?

    Yaka Finance ($YAKA) is Sei Network’s native liquidity engine. Here are some features of Yaka Finance:

    • A liquidity hub within the SEI ecosystem: Yaka Finance aims to integrate the liquidity flywheel of VE (3,3) with a launchpad, creating an optimal environment for SEI trading and attracting protocol participation.
    • A DEX with NFT utility: Yaka Finance introduces Yaka Voyager NFTs, which offer minters and stakers a share of the YAKA token airdrops and the DEX trading fees, aligning them with the long-term vision of Yaka Finance.
    • A winner of the Code Sei Hackathon: Yaka Finance secured 1st place in the “Code Sei: Powering New Gaming and Defi Exchanges” Hackathon and received grants from the ecosystem, demonstrating its innovation and competitiveness.
    • A protocol with a revenue-sharing model: Yaka Finance designs its NFTs to optimize minting quantities and incentivize early supporters, as well as allocating 50% of the funds raised for liquidity and liquidity incentives.

    What is the Yaka Finance ($YAKA) token?

    Yaka Finance’s native token is known as $YAKA. They also have a $veYAKA token. $YAKA will be Yaka Finance’s utility token, whilst $veYAKA will be their governance token in the form of an NFT.

    The YAKA token has the following uses:

    • Liquidity provision: Users can earn $YAKA tokens by providing liquidity to the protocol’s pools.
    • Governance participation: Users can lock their $YAKA tokens for up to 2 years and receive $veYAKA tokens, which are NFTs that represent voting power and access to protocol revenue.
    • Gauge voting: Users can use their $veYAKA tokens to vote for gauges, which are pools with dynamic rewards based on weekly allocation. Users can also receive bribes from third parties for their votes.
    • Revenue claim: Users can claim their share of the trading fees and bribes from the gauges they have voted for after each epoch, which lasts for 7 days.
    • Lockup: You can lock up 100 $YAKA for 2 years to become 100 $veYAKA. Meanwhile, 100 $YAKA can be locked up for 2 years to become 25 $veYAKA.

    On the other hand, the $veYAKA token has the following uses:

    • Protocol revenue access: $veYAKA token holders can vote for gauges every week, and access 100% of the trading fees and the bribes for the associated pool.
    • Governance participation: $veYAKA holders can participate in governance and cast votes for the protocol improvement proposals.
    • Voting benefits: $veYAKA voters can receive trading fees generated by the pool(s) they vote for, bribes deposited for the pools they vote for and weekly $veYAKA distribution.

    How to get Yaka Finance ($YAKA) token airdrop?

    Yaka Finance ($YAKA) have mentioned several tasks which could qualify you for their potential airdrop.

    Time needed: 50 minutes

    Here’s how to get the Yaka Finance ($YAKA) token airdrop

    1. Download and set up your SEI Network wallet

      Download and set up your Compass Wallet. Connect your wallet to Yaka Finance

    2. Connect to Yaka Finance

      Connect your Compass wallet to Yaka Finance

    3. Get testnet $SEI tokens

      Go to https://atlantic-2.app.sei.io/faucet. Connect your wallet and Discord account. Then request some testnet $SEI tokens. This will give you 5 $SEI tokens daily on your wallet. If you want to get more testnet $SEI tokens, join Yaka Finance’s Discord.

    4. Swap on Yaka Finance

      Go to https://app.yaka.finance/#/swap. Swap between testnet SEI, YAKA, USDT, and USDC. Every transaction you make on the testnet gains you 10 points towards the airdrop.

    5. Add liquidity

      Go to https://app.yaka.finance/#/pools. Select a pool and add assets to the pools.

    6. Galxe quest

      Go to Yaka Finance’s Galxe page and complete the tasks. These are social tasks such as joining and interacting with Yaka Finance’s social media pages. Note, one of the tasks will require you to join the Yaka Finance’s Discord and obtaining the Yaka Blast role by going to #special-roles and clicking the crown emoji.

    7. Obtain roles on Yaka Finance Discord

      Join Yaka Finance’s Discord and get the Yaka Blast role by going to #special-roles and reacting to the crown emoji. Then, engage with the community and earn roles on Discord like Yaka Lad, Yaka Gent, Yaka Aquaman or Meme Master. You will be required to obtain these roles in order to get whitelist access.

    8. Complete Whitelist Tasks

      Once you have joined Yaka Finance, participate in their whitelist round to secure a spot for the public sale. There are different roles you can choose from, such as Twitter influencer, meme creator, or community member. Follow the instructions for each role and complete the required tasks to earn points.

    9. Engage with the Community

      Being an active member of the Yaka Finance community can also help you earn points. Join their Discord channel or other community forums. Interact with other community members, contribute valuable insights, and participate in discussions. Yaka Finance values community engagement and they reward active members accordingly.

    10. Check your airdrop points

      Connect your wallet to Yaka Finance and go to the “Airdrop” page to check your airdrop points.

    11. Mint Yaka Voyager NFT

      Once you have obtained the Yaka Blast role, go back to their Galxe page and connect your SEI wallet. Then mint your Yaka Voyager NFT. Note you will need to have some $SEI to pay transaction fees. But it is quite cheap.

    12. Stake Yaka Voyager NFT

      Once the SEI EVM mainnet is live, you can stake your Voyager NFT on the Yaka Finance DEX to earn a portion of the trading fees and royalties from secondary sales.

    13. Earn rewards!

      Yaka Voyager NFT holders and stakers are entitled to receive $YAKA token airdrops, with a fixed total airdrop of 6 million YAKA. In addition, Yaka Voyager NFT stakers will receive a share of the YAKA DEX trading fees.

    14. Participate in Yaka Finance Testnet Season 2

      To participate in Yaka Finance Testnet Season 2, connect your Compass Wallet to https://v2.yaka.finance/campaign, and you’ll see a UI that allows you to approve the EVM version for Yaka Finance. Locate both your SEI native address (you can find this in your SEI wallet) and EVM address.

    15. Get testnet SEI and YAKA tokens

      Go to the SEI Arctic 1 faucet and paste your EVM address which will give you two testnet SEI tokens. Afterwards you will be able to claim some testnet YAKA tokens. Note you will need to sign a transaction in your Compass wallet to claim the YAKA testnet token.

    16. Complete swaps

      Using your testnet tokens, swap the SEI/USDT, SEI/YAKA, YAKA/USDT, SEI/SEIYAN and USDC/USDT pairs.

    17. Add liquidity

      Add liquidity to the SEI/USDT, SEI/YAKA, YAKA/USDT, SEI/SEIYAN and USDC/USDT pairs.

    18. Lock $YAKA

      Click “Go” and create a lock, you can put as little as 0.1 $YAKA and there are no requirements on how long you must lock for. Then, click “LOCK” and approve the transaction.

    19. Vote using $YAKA

      Go to Vote and select any pair. Make sure you enter 100% and cast your vote. Finally, approve and verify the transaction.

    20. Invite friends

      Once you have completed at least 1 swap and added liquidity to at least 1 pool you will be able to unlock the invitation link. Then, use your invite link to invite friends for extra points. However, your friends must complete at least 1. swap, deposit, lock or vote in order to earn points.

    Yaka Finance ($YAKA) airdrop review

    When reviewing an airdrop, there are several factors to consider. First, the likelihood the project will even do an airdrop in the first place. Then, to look at how many tokens the project intends to allocate towards airdrop campaigns, as well as the difficulty in participating in their airdrop. It is also important to look at the utility of the token so that there will be an actual use and purpose in participating in the airdrop in the first place. Finally, a factor to consider when reviewing an airdrop is whether the airdropped tokens are subject to any lockup period.

    Likelihood of airdrop: Yaka Finance ($YAKA) airdrop is now live!

    Airdropped token allocation: Yaka Finance have confirmed they will reserve 12 million (6% of their token supply) for the airdrop campaign, with a 1-month lockup period.

    Airdrop difficulty: The Yaka Finance airdrop requires participants to interact with their testnet and complete simple social tasks on their Galxe page. The only real assets you will need is a small amount of $SEI to pay gas fees to mint NFTs.

    Token utility: The Yaka Finance ($YAKA) token will be for liquidity provision, governance and entitlement to rewards.

    Token lockup: Airdropped Yaka Finance ($YAKA) tokens will be locked for 1 month after the Token Generation Event.
  • LayerZero ($ZRO) Token Airdrop How to claim

    LayerZero ($ZRO) Token Airdrop How to claim

    Looking for free tokens with huge upside potential? LayerZero is one of the major upcoming crypto airdrops, funded by many reputable global enterprises such as PayPal. The LayerZero airdrop is now available to claim. This is our LayerZero airdrop ultimate guide.

    Check out our zkSync ($ZKS) Token Airdrop Guide for another highly anticipated airdrop.

    LayerZero ($ZRO) Airdrop Step-by-Step Guide

    Here’s a step-by-step guide on how to get a potential LayerZero ($ZRO) token airdrop:

    1. Interact with Stargate Finance
    2. Interact with Stargate Bridge on LayerZero
    3. Use Stargate on Bungee
    4. Use the USDC LayerZero Bridge
    5. Use the Aptos Bridge
    6. Use LiquidSwap Bridge
    7. Use LEVEL Finance Bridge
    8. Use SushiSwap Cross-Chain Swap
    9. Use BitcoinBridge
    10. Interact with other dApps on LayerZero
    11. Get roles on the Stargate Guild

    See below for more details!

    What is LayerZero?

    LayerZero is a trustless omnichain interoperability protocol designed to connect multiple chains. Let’s break it down what this means in simple terms:

    Underlying Issues of Current Interoperability Techniques

    Interoperability is a big problem for blockchains. Blockchains can’t talk to each other in a way that makes sense, so they’re like separate islands. This makes it hard for people to move things like money and data between them. There are two ways to fix this, but they both have problems.

    Middle Chain

    In the blockchain world, there are some protocols that help blockchains talk to each other such as Polkadot or Cosmos. They’re like a middleman that helps different blockchains exchange messages. This is a good way to make sure that blockchains can work together and it’s not too expensive. But it’s not very secure because if something goes wrong with the middleman, then everything can be stolen. It’s like having all your eggs in one basket.

    On-Chain Light Node (Decentralized Bridges)

    Instead of having one person in charge, decentralized cross-chain bridges use on-chain light nodes to communicate between blockchains. A light node is like a small part of the blockchain ledger’s transaction history. It’s connected to a full node to make sure everything is correct.

    To send messages between chains, light nodes on one chain check the metadata of a block from another chain. Then they send proof of the transaction to the other chain. This is a safe way to send messages between chains, but it’s also very expensive. You would need to build a new bridge for every pair of chains, and each one would need its own interface and code.

    LayerZero’s Solution to Interoperability

    Instead of a middle chain or a layer-2 solution, LayerZero provides a massive infrastructure that would seamlessly enable direct, trustless transactions across all chains. Think of it like this: if blockchains are nations and bridges are immigration, then LayerZero would be a global super-passport and air-traffic control that allows communication between all blockchains at once. It focuses more on the communication problem of the interoperability layer (layer 0) rather than providing a third party solution like a bridge or middle chain.

    source: LayerZero Whitepaper

    LayerZero achieves this by using on-chain light nodes in a much more economical way. The team behind LayerZero, LayerZero Labs, coined it Ultra Light Node (ULN). The ULNs are connected to oracles and relayers, both independent off-chain entities in charge of transferring messages from one chain to another.

    Instead of keeping all block headers sequentially, block headers are streamed on demand by decentralized oracles, i.e. Chainlink, allowing the ULN endpoints to be small and cost-effective. The relayers are responsible for moving transaction proofs. Initially, LayerZero Labs will run and maintain the relayers, which will soon be fully open-sourced so that anyone can operate their own relayer.

    source: LayerZero Whitepaper

    Moreover, the use of an oracle-relayer pair provides additional layers of security since responsibilities are broken up. But if both parties are compromised, LayerZero would be vulnerable to attacks–no easy task, given the progressive decentralization of relayers growing in the network.

    Who is the Team behind LayerZero?

    LayerZero Labs, a Vancouver-based startup, developed LayerZero protocols to enable omnichain decentralized applications across multiple blockchains. LayerZero was co-founded in 2021 by Bryan Pellegrino, Ryan Zarick, and Caleb Banister. The three have previously worked together in computer network research labs at the University of New Hampshire.

    LayerZero Labs have recently raised US$120 million in Series B funding at a valuation of US$3 billion. The funding is expected to go towards growth initiatives, in particular expanding the Company’s presence in the Asia-Pacific. In March 2022, LayerZero Labs raised $135 million in a Series B funding round from the likes of FTX Ventures, Coinbase Ventures, Uniswap Labs, Sequoia Capital, a16z, PayPal Ventures and more. Interestingly, LayerZero is PayPal’s first ever web3 investment. Seeing as that PayPal is one of the world’s leading payment networks this goes to show LayerZero has huge potential that spans beyond the crypto space.

    Does LayerZero have a Token?

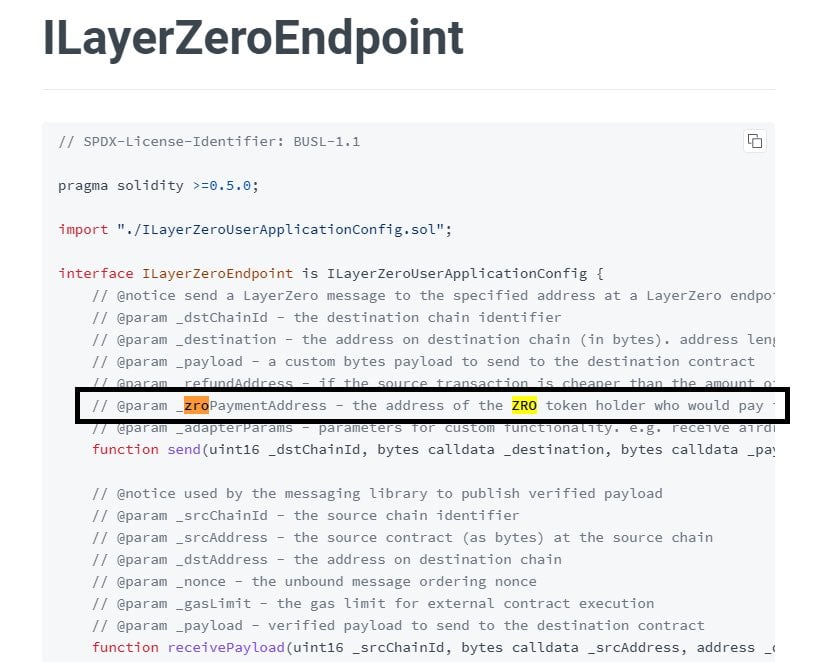
    LayerZero does not have a token YET. But based on their information code we know it will be called $ZRO.

    source: LayerZero Gitbook

    How to Receive Potential LayerZero Token Airdrop?

    Interact with Stargate Finance

    Stargate Finance (Check out our airdrop guide here) is the first live LayerZero protocol. LayerZero Labs believes Stargate will be integral to any dApp that wants to move cryptocurrency across blockchains. Thus, Stargate users, especially DAO voters, could have a very high chance to receive $ZRO airdrops. Here’s how to stake and become a DAO Voter on Stargate:

    1. Buy Stargate’s $STG token (for as little as $0.74) on centralized crypto exchanges like Bybit or on decentralized exchanges like Uniswap. We suggest staking at least 25 $STG because it is the minimum required to get some guild roles.
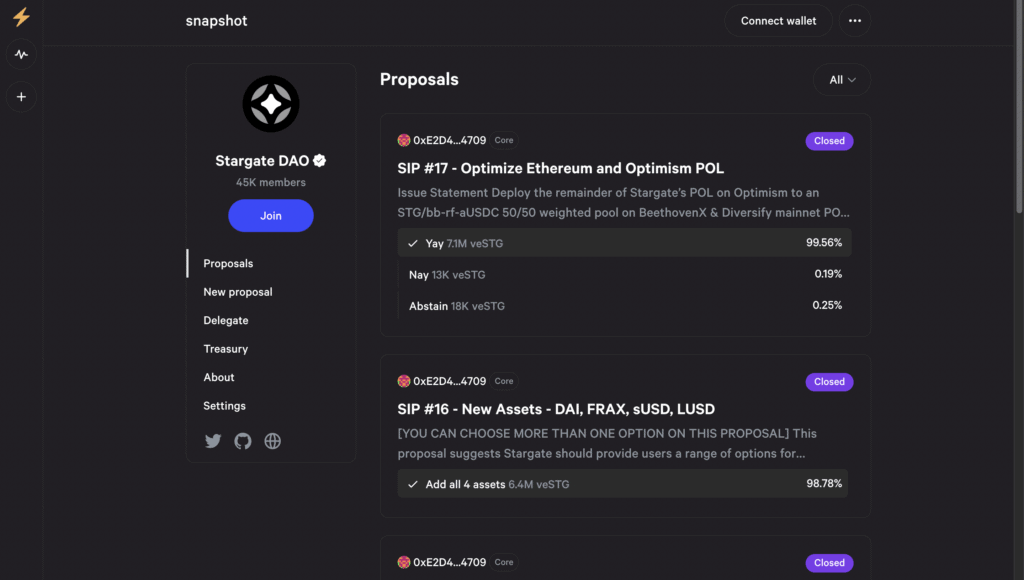
    2. Stake $STG to get $veSTG. This gives you voting power on Stargate’s staking tab: https://stargate.finance/stake. The staking period can range from 1 to 36 months. You can also browse the pools and farms on the staking page to earn more $STG yields.
    3. Add liquidity to Pools. Go to https://stargate.finance/pool, choose your preferred Pool and add liquidity. You can remove liquidity at any time on the “Remove” tab. You earn LP tokens as a reward, which then be farmed to get $STG. Check our guide here.
    4. Regularly vote on governance proposals. Tip: Select “Turn On My Notifications” so you don’t miss any voting opportunities.

    Interact with Stargate Bridge

    Interact with dApps such as Stargate Finance’s Stargate Bridge by bridging your funds across networks repeatedly to generate volume. To do this, select the “from” token and network, the “to” token and network, and confirm your transaction.

    Bonus: How to save costs when using Stargate Bridge

    Here’s how to save costs when using Stargate Bridge:

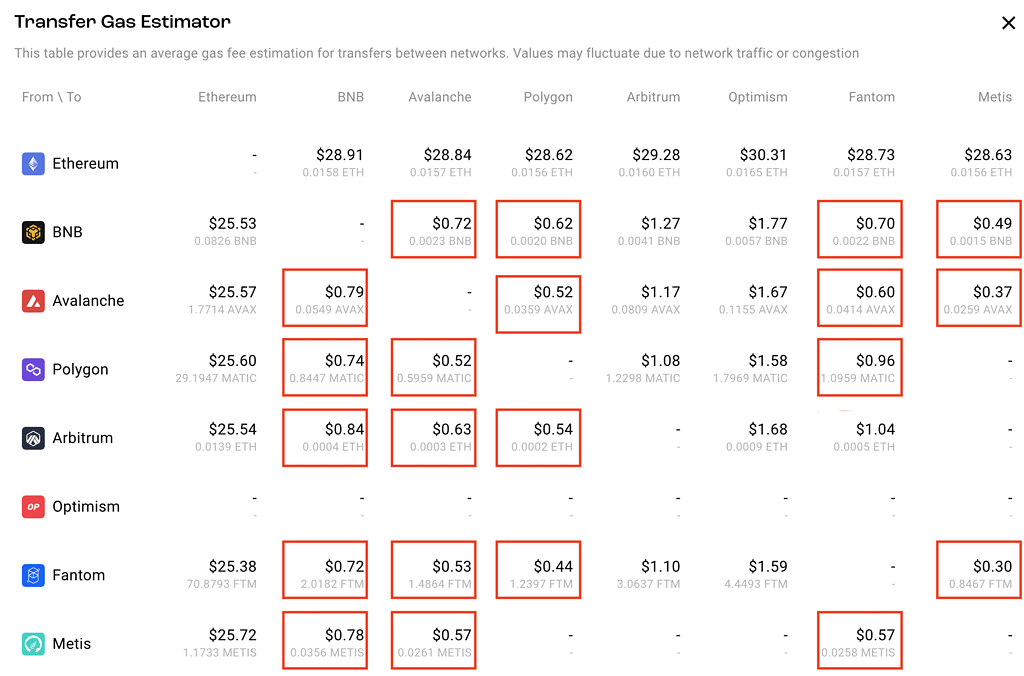
    1. Do not transfer assets to/from the Ethereum network as it usually costs the most.
    2. Instead, to save costs when using Stargate Bridge transfer to/from these networks: BNB/AVAX, BNB/MATIC, BNB/FTM, BNB/METIS, AVAX/MATIC, AVAX/FTM, AVAX/METIS, MATIC/FTM, ARB/BNB, ARB/AVAX, ARB/MATIC and FTM/METIS.
    3. Check the estimated gas cost before bridging by clicking “Transfer Gas Estimator” before transferring assets.

    Use Stargate on Bungee

    Bridge tokens on Bungee using the Stargate route. This will also make you eligible for the Bungee, Socket and Stargate potential airdrops. For more details, see our Bungee token airdrop guide.

    Use the USDC LayerZero Bridge

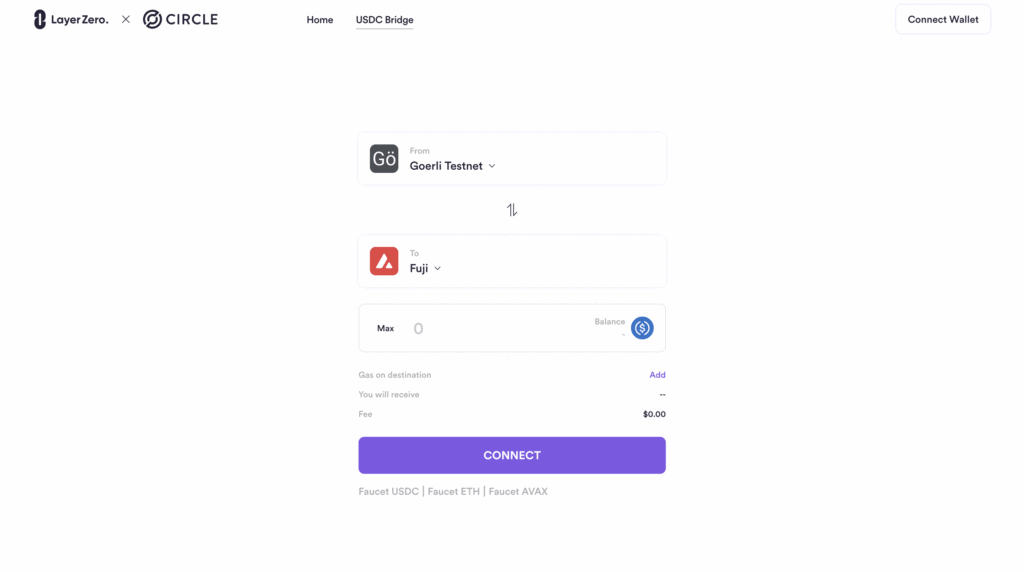
    You can use the USDC LayerZero bridge (https://usdcdemo.layerzero.network/bridge) to transfer USDC between EVM chains.

    USDC Goerli Contract Address: 0x07865c6E87B9F70255377e024ace6630C1Eaa37F
    USDC Avax Contract Address: 0x5425890298aed601595a70AB815c96711a31Bc65

    Use the Aptos Bridge

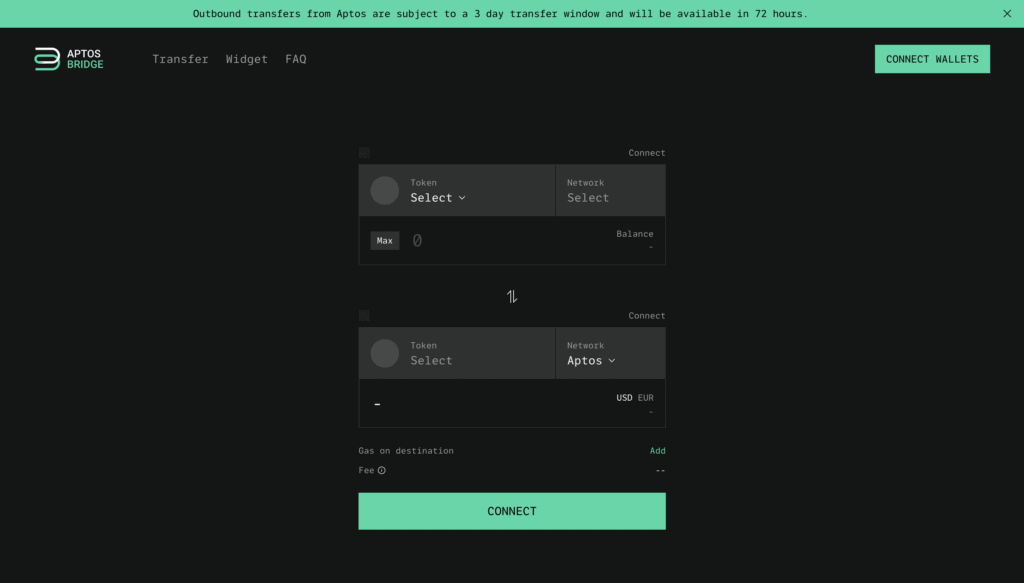
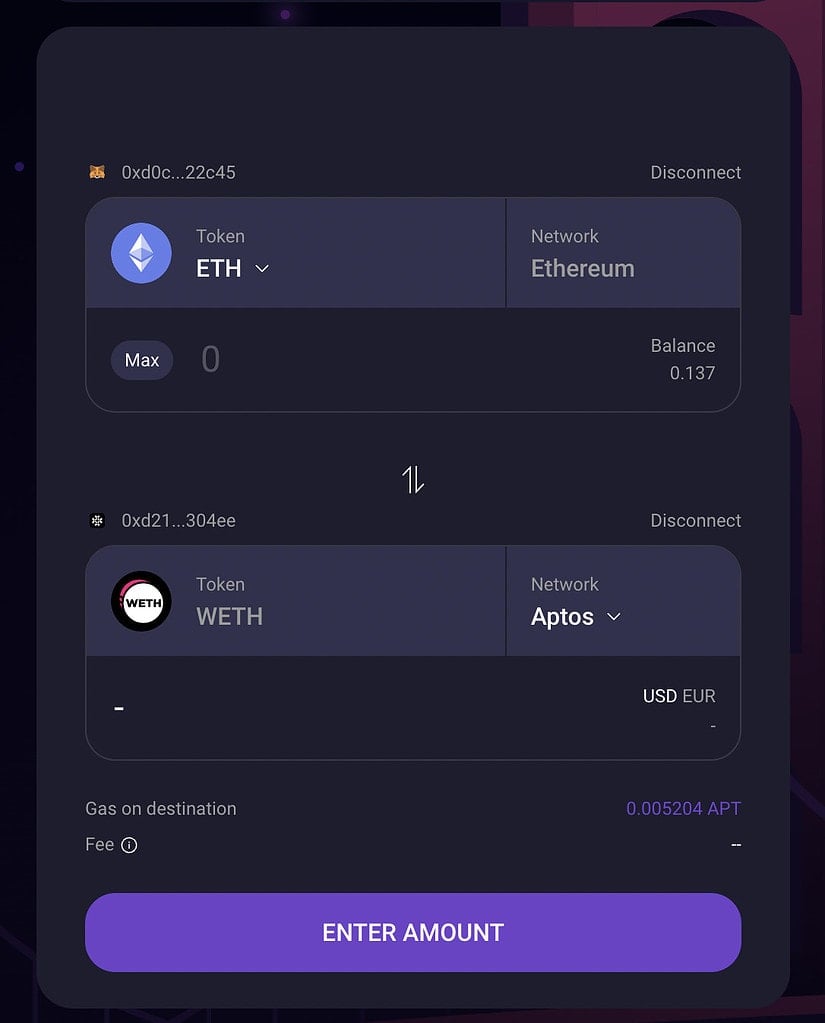
    The Aptos Bridge is powered by LayerZero. You can move USDC, USDT, and ETH from Ethereum, Arbitrum, Optimism, Avalanche, Polygon, and BSC to the Aptos network. Connect your EVM (e.g. MetaMask) and Aptos wallets (e.g. Martian wallet). Then, choose the number of cryptocurrencies and networks you wish to use. However, keep in mind there is a 3-day transfer window if you want to withdraw your funds out of the Aptos ecosystem. You will also need to pay gas fees in Aptos $APT tokens.

    To use the Aptos Bridge with the least amount of gas fees, transfer USDC from BNB Chain to Aptos network. To do this, you will need USDC and BNB (gas fees) in your EVM wallet (e.g. MetaMask). You will also need $APT to your Martain wallet to pay for gas fees.

    Use the LiquidSwap Bridge

    Go to https://bridge.liquidswap.com/ and bridge USDT, and ETH from Ethereum or Arbitrum to the Aptos network. Connect your EVM (e.g. MetaMask) and Aptos wallets (e.g. Martian wallet), and choose the cryptocurrency and network (Ethereum/Arbitrum to Aptos and vice versa) you wish to bridge tokens. Note you will need to pay gas fees in Aptos $APT tokens.

    Use LiquidSwap Bridge

    Use LEVEL Finance Bridge

    LEVEL Finance is a decentralized perpetual exchange on BNB Chain that provides risk management solutions for liquidity providers and is built by experienced entrepreneurs and contributors. To use LEVEL, you will need to buy their native $LVL token on DEXs such as Uniswap or Pancakeswap. Then, go to LEVEL Bridge and bridge $LVL tokens between BNB Chain and Arbitrum. Note that depending on which direction you are bridging, you will need BNB or ETH for gas fees.

    Use SushiSwap Cross-Chain Swap

    SushiSwap released its SushiXSwap, which is built upon LayerZero’s Stargate protocol. You can swap tokens directly to another network without using a bridge. As such, users are likely to be qualified for a $ZRO token airdrop!

    Use BitcoinBridge

    BitcoinBridge allows users to transfer BTC.b. BTC.b is a new type of wrapped Bitcoin that can be used on the Avalanche Network. It is moved to Avalanche using the Avalanche Bridge. This makes it easy to use Bitcoin on many different networks with the help of LayerZero.

    Meanwhile, BitcoinBridge is a good way for people on a budget to interact with the LayerZero ecosystem. Doing 20 transactions on BitcoinBridge will only cost around US$15! Here’s how to use BitcoinBridge:

    1. Buy BTC.b on Trader Joe here.
    2. Connect your EVM and Aptos wallets here.
    3. Bridge assets between different networks.

    Use Rage Trade

    Rage Trade is a double-legged trading protocol that offers a perpetual ETH swap and a USDC yield-farming product built on Arbitrum and LayerZero. Therefore, interacting with it may qualify you for 3 airdrops at the same time! To use Rage Trade, simply trade and deposit and stake on their platform. Also, contribute to their community.

    For more details check out our Rage Trade Token Airdrop Guide

    Use Altitude

    Altitude ($ALTD) is a dApp built on LayerZero, designed to allow DeFi users to transfer assets with enhanced security features, inexpensive bridging fees, and fast transactions. Altitude have confirmed they will launch its $ALTD token as well as an airdrop when their mainnet launches!

    See: Altitude ($ALTD) Token Airdrop Guide

    Use Dexalot

    Dexalot is a decentralized exchange that uses LayerZero as its default bridge provider. To use Dexalot, you will need to have ETH on the Arbitrum network and AVAX on the Avalanche network. Connect your wallet to Dexalot and go to the “Portfolio” tab, making sure you are on the Avalanche network. At the bottom of the page you will see a list of your tokens, select AVAX and click the 3 points on the right hand side. On the popup window, deposit some AVAX onto Dexalot. Note however depending on the amount of AVAX deposited, it may cost more gas fees to withdraw than the amount itself. So you may need to consider it as a loss for the sake of interacting with Dexalot.

    Interact with Abracadabra

    Abracadabra is intergrated with Layer Zero and allows users to borrow, leverage or earn yield. To interact with Abracadabra, you will need to have their native $MIM token. $MIM can be purchased on several decentralized exchanges such as Uniswap, Sushiswap or Trader Joe. Make sure you are on the Avalanche network, or you will have to first bridge your $MIM tokens there. Back on Abacadabra, send one $MIM token from Avalanche to Arbitrum network. If you don’t want to keep your $MIM tokens, you can proceed to sell it for ETH on Arbitrum.

    Use SteakHut Finance

    SteakHut Finance is a yield optimization protocol that has integrated with LayerZero to launch $STEAK as an omnichain token. On SteakHut, $STEAK will be abe to be bridged across Avalanche, Arbitrum and eventually other blockchains on a 1:1 ratio. To use SteakHut, you will need to buy $STEAK tokens on the Avalanche Network. Note that currently only Trader Joe offers $STEAK tokens. Afterwards, connect your wallet to SteakHut and go to the “Bridge” tab. Send your $STEAK tokens to Arbitrum. You can also send your $STEAK tokens in reverse i.e. from Arbitrum to Avalanche networks. This would increase the number of interactions you have with SteakHut, which may put you in a better position for any potential airdrop. Note that you will need to pay gas fees in AVAX.

    Interact with Mummy Finance

    Mummy Finance is integrated with LayerZero and lets users trade BTC, ETH, FTM, OP, ARB and other cryptocurrencies with up to 100x leverage. To interact with Mummy Finance, you will first need to buy some of their native $MMY tokens on the Arbitrum network here. Then, go to Mummy bridge and bridge your tokens from the Arbitrum to Fantom network. Note it may cost more gas fees transfer back or sell your $MMY tokens. Therefore, you may need to consider it as a loss for the sake of interacting with Mummy Finance.

    Interact with other dApps on LayerZero

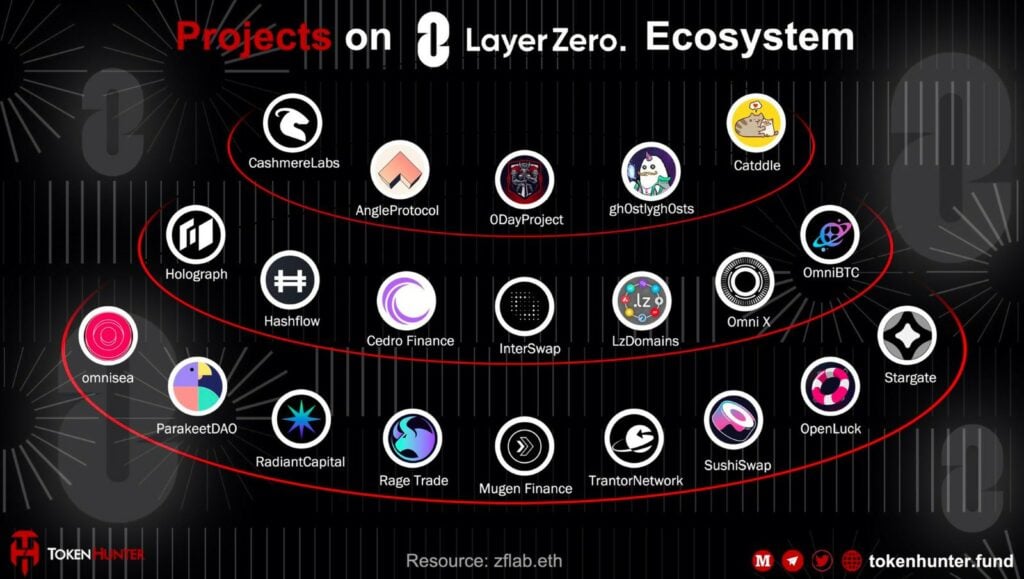
    You can also interact with other dApps on LayerZero including Holograph, Mugen Finance, Radiant Capital, Omni X or Angle Protocol. You can make small transactions, deposit funds, provide liquidity, swap assets etc. By actively and consistently using the ecosystem, it is highly likely LayerZero will reward users who genuinely interact with the ecosystem.

    source: TokenHunter

    Get roles on the Stargate Guild

    Here’s how to get roles on the Stargate Guild:

    1. Connect your Ethereum wallet to https://guild.xyz/stargate.
    2. To get the veStaker role, hold at least 25 $veSTG. To do this, buy at least 25 $STG on exchanges such as BybitBinance, or Uniswap. Then, stake your $STG here to get $veSTG. For detailed instructions see above.
    3. To get the 100 STG role, you will need to hold at least 100 $STG. Note that staked $STG does not count.
    4. To get the 1k LP Farmer role, supply at least $1,000 of USDC, USDT or BUSD on Ethereum, BNB Chain, Avalanche, Polygon, Arbitrum, Optimism or Fantom (not Metis) to receive LP tokens.

    How to claim the LayerZero ($ZRO) token airdrop?

    Here’s how to claim the LayerZero ($ZRO) token airdrop:

    • Connect your wallet or paste your wallet address to https://layerzero.foundation/claim to check your eligibility.
    • To claim the LayerZero ($ZRO) token airdrop, those who are eligible must donate US$0.10 in USDC, USDT or native ETH per $ZRO. This is known as LayerZero’s Proof-of-Donation mechanism. Donations would go to the Protocol Guild.
    • Users can claim from the following chains: Ethereum, Arbitrum, Optimism, Base, Polygon, BNB Chain, and Avalanche.
    • Once claimed, $ZRO holders can transfer their tokens via the above chains using Stargate.

    LayerZero Airdrop Review

    When reviewing an airdrop, there are several factors to consider. First, the likelihood the project will even do an airdrop in the first place. Then, to look at how many tokens the project intends to allocate towards airdrop campaigns, as well as the difficulty in participating in their airdrop. It is also important to look at the utility of the token so that there will be an actual use and purpose in participating in the airdrop in the first place. Finally, a factor to consider when reviewing an airdrop is whether the airdropped tokens are subject to any lockup period.

    Likelihood of Airdrop: The LayerZero token airdrop is available to claim from 20th June to 20th September 2024.

    Airdropped Token Allocation: 85 million $ZRO are available to claim.

    Airdrop Difficulty: To be eligible for the LayerZero token airdrop, users could submit unique proposals for LayerZero or provided multiple ongoing transactions on the protocol.

    Token Utility: The LayerZero ($ZRO) token acts as a governance token, and to facilitate transactions across different blockchain networks.

    Token Lockup: The token will be unlocked on launch. However, those who are eligible for the airdrop must donate US$0.10 per $ZRO to claim the token

  • Wormhole ($W) token airdrop guide

    Wormhole ($W) token airdrop guide

    Wormhole is a communication protocol that allows different blockchains to send messages to each other, enabling the creation of cross-chain applications by developers. Meanwhile, Monad is one of the first projects to partner and integrate with Wormhole, so there may be a chance for a Monad airdrop too! Wormhole has finally launched its $W token staking platform and staking on the platform may potentially qualify you for future Wormhole token airdrops and a potential Monad token airdrop! Here is our Wormhole ($W) token airdrop guide.

    Check out our step-by-step guide!

    Stake Wormhole ($W) for Monad AIRDROP (Time Sensitive)

    What is Wormhole ($W) and Monad?

    Wormhole is a basic system that helps different blockchains talk to each other. Here are some of Wormhole’s main features:

    • Message Passing Protocol: Wormhole is a generic protocol that facilitates communication between different blockchains, allowing them to interoperate.
    • Cross-Chain Applications: It enables the creation of cross-chain applications by developers, leveraging the strengths of multiple blockchain ecosystems.
    • Non-Blockchain Entity: Wormhole itself is not a blockchain; instead, it acts as a bridge for message passing between blockchains or rollups.
    • Ecosystem Support: The protocol supports a growing number of blockchains and encourages developers to join its ecosystem.

    Meanwhile, Monad is one of the largest valuation projects so far in 2024 at 3 billion dollars. They are also one of the first projects to partner and integrate with Wormhole to provide day 1 cross-chain support. Therefore, Wormhole staking has the potential to be a core criterion for earning the Monad airdrop as well.

    How to get the Wormhole ($W) token airdrop?

    Here’s how to get the potential Wormhole ($W) token airdrop

    1. Connect to Wormhole

      Go to https://www.tally.xyz/gov/wormhole and connect your wallet.

    2. Start staking

      Click on “Stake for Governance” and “Start” to begin the staking process. Choose to either delegate to yourself or to other stakers. If you want to take an active part in governance, delegate to yourself; otherwise, select active institutions like BlockWorks Research. Then confirm and continue to the next step.

    3. Transfer from Solana

      You can skip this step if you have Wormhole ($W) tokens on a supported EVM network. This is because Wormhole $W is an SPL token on Solana. Therefore, in order to stake you will need to bridge it to an Ethereum layer 2 or Ethereum. However, you would want to avoid using Ethereum due to higher fees. Instead, opt for layer 2s like Base Mainnet (preferred), Arbitrum, or Optimism. To bridge, connect your Base Mainnet wallet and your Solana wallet and follow the steps to complete the bridging process. It should take about 2-3 minutes for the tokens to appear in your Base wallet on Metamask.

    4. Confirm staking (TIME SENSITIVE)

      Once the Wormhole ($W) token is in your Base wallet, confirm to stake for governance. Make sure you do this by 11:59pm UTC on 10th June 2024.

    5. Get at least 40 points on Nomis

      Nomis is a protocol that lets users establish and build their Web3 reputation. For the next steps, you will need at least 40 points on Nomis. This is to filter out Sybil farmers. To start getting points on Nomis, connect your wallet to https://nomis.cc/multichain and click “Get Score”.

    6. Mint score on Nomis

      To mint score on Nomis, click “Mint Score”. Note it costs 8 MATIC to mint your score.

    7. Get Steakorrr role

      Go to Wormhole’s Galxe Page and click on the “Steakorrr” task. You would potentially qualify for the Steakorrr Discord role if had completed step 4 by 11:59pm UTC on 10th June 2024. Note that this Discord role is also on a first come first served basis.

    8. Complete Galxe tasks

      Complete the other tasks on Wormhole’s Galxe Page, these include getting at least Level 1 on the Galxe Web3 Humanity Score and following Wormhole’s social media accounts.

    9. Participate in Wormhole’s Discord channel

      Wormhole’s Discord channel has a social credit system where you can earn roles through participation.

  • Rivo token airdrop guide

    Rivo token airdrop guide

    Rivo is an all-in-one DeFi platform that integrates a smart contract wallet across multiple chains with a DeFi marketplace. It simplifies access to DeFi opportunities, allowing users to earn with just a single click. They have just launched its Points Program where users can qualify for a token airdrop which is likely to be in Q4 2024. Here is our Rivo token airdrop guide.

    Check out our step by step guide

    Rivo Airdrop: HUGE Yield Farming Strategies (We are EARLY)

    What is Rivo?

    Rivo is a DeFi platform that combines a multichain smart-contract wallet with a DeFi marketplace. They are partners with some of the top DeFi protocols in the world including Yearn Finance and Beefy Finance. Here are some of Rivo’s main features:

    1. Smart-Contract Wallet:
      • Seedless Self-Custody: Rivo’s wallet allows users to create an account without a seed phrase, using Google or social media accounts.
      • Multichain Support: Rivo supports major networks like Ethereum, Polygon, Arbitrum, Optimism, Binance Smart Chain, and Avalanche.
      • Cross-Chain Swaps: Users can perform one-click cross-chain swaps directly from their wallet.
    2. DeFi Marketplace:
      • Curated Strategies: Rivo enables users to invest in advanced DeFi strategies selected by professional analysts.
      • Educational Content: Users can access exclusive video tutorials, risk assessment dashboards, and visualized content.
      • Portfolio Tracking: Once invested, users can track their portfolio analytics and view detailed profit and loss (PnL).
      • Integration with Leading Protocols: Rivo has established partnerships with protocols like Frax Finance, Convex, and Yearn Finance.

    How to get the Rivo token airdrop

    Time needed: 50 minutes

    Here’s how to get the potential Rivo token airdrop. Note Rivo has launched its mainnet, so completing any tasks involves using real fund. Therefore, users should be aware of any risks.

    1. Sign up

      Connect your wallet at Rivo HERE. You also have the option to create a Rivo Wallet

    2. Use any strategy on Rivo

      Put your funds into any Yield Marketplace or Yield Indices on Rivo. Yield Indices are baskets of yields provided by Locust. You can choose based on risk levels provided. For lower risk, opt for single-asset strategies like the ETH liquidity pool to avoid impermanent loss and liquidation risks. Most importantly, ensure it aligns with your risk tolerance and return expectations.

      You can choose from various vaults partnered with projects like Pendle, Gearbox, Hop Finance, and more. You will earn 1 point for every US$1 put in. And if you put at least US$1,000 in any strategy and hold the position for 14 days, you will mint the Founding Member NFT, granting you a percentage boost in points.

      To put your funds into Rivo’s Yield Marketplace or Indices, click on the page on the left hand bar. Then, click on the vault and click the “+” button on the top right hand side. Select your token and the amount and follow the steps as shown.

    3. Swap on Rivo

      Make a swap on Rivo to earn 0.1 point for every US$1 swapped. To swap, click the opposing arrow buttons on the left hand side. Then select your token pairs and complete the swap. To avoid high transaction fees, use cheaper chains such as Arbitrum.

    4. Complete bonus tasks for extra points

      Bonus tasks allow you to collect extra points. Tasks include putting in US$1,000 into any Yield Index or Marketplace Strategy, completing a survey, or generating US$1,000 in swap volume.

    5. Complete Zealy tasks

      Go to Rivo’s Zealy Questpage and complete the tasks. Tasks include visiting their pages and following their social media.

    6. Refer your friends

      Copy your referral code on the main page and refer your friends. You will earn 8% of your friends’ points.

    7. Check back often!

      Bonus tasks are updated occasionally, so check back often and complete the tasks!

  • Lagrange token airdrop guide

    Lagrange token airdrop guide

    Lagrange is a company that specializes in enabling verifiable computation over blockchain data at scale, using their hyper-parallel ZK Coprocessor and State Committee products to support data-intensive and cross-chain applications. They have recently launched a Galxe quest where you can try out their ZK Coprocessor. However, you must do these tasks before 24th May 2024! As with other projects, there is a possibility this could be a task for a potential airdrop in the future! Here is our Lagrange token airdrop guide.

    Check out our step by step guide

    Lagrange Potential Airdrop: Underfarmed BUT Time-Sensitive!!

    What is Lagrange?

    Lagrange is a company that specializes in cryptographic solutions for blockchain interoperability and verifiable computation at scale. Here’s are its main features:

    • ZK Coprocessor: A hyper-parallel processor that pre-processes blockchain data into a SNARK-optimized structure, enabling large-scale SQL queries to be proven at low cost.
    • State Committee Protocol: Generates State Proofs for optimistic rollups and integrates with interoperability protocols like LayerZero, Axelar, and Polymer, enhancing secure cross-chain interactions.
    • Research & Development: Focuses on deep research and publishes peer-reviewed papers in top cryptography conferences, ensuring their work is foundational and impactful.
    • Ecosystem Growth: Through strategic partnerships and integrations, Lagrange is expanding its ecosystem, with a network of node operators and a commitment to supporting the development of secure interoperability in crypto.

    Lagrange has recently announced their US$13.2 million seed round led by Founders Fund. Other investors in this round include Fenbushi Capital, Volt Capital, CMT Digital, Ventures, 1kx, Maven11, Mantle Ecosystem Fund and others.

    How to get a potential Lagrange token airdrop?

    Here’s how to get the potential Lagrange token airdrop

    1. Connect to Lagrange Galxe page

      Connect your MetaMask wallet to Lagrange’s Galxe page HERE.

    2. Get a Galxe Web3 Humanity Score of at least level 2

      Ensure you have at least a level two humanity score on Galaxe Web3. If you’re new, there’s a two-month free trial, or renew for 5 USDT on the Polygon chain if expired.

    3. Perform SELECT queries from Base on the Pudgy Penguins NFT collection

      Go to the Base Scan platform and execute SQL queries directly from the smart contracts related to the Pudgy Penguins NFT collection. You can find detailed instructions on how to do this HERE or see steps 4 to 9 below.

    4. Connect wallet to Basescan

      Visit the sample query client on Basescan HERE and click “Connect to Web3” to link your wallet.

    5. Enter query

      Expand the “Query” section and enter the following values:
      “query”: 0.00015
      “storageContract”: 0xBd3531dA5CF5857e7CfAA92426877b022e612cf8 (i.e. the Pudgy Penguins contract address)
      Offset: 5

    6. Enter address in holder

      In “holder”, enter an address you would like to query (e.g. 0x29469395eAf6f95920E59F858042f0e28D98a20B for the Blur NFT marketplace).

    7. Enter “startBlock” and “endBlock” fields

      Set the “startBlock” and “endBlock” fields for your search (eg. 19774897 to 19774997).

    8. Execute query

      To execute query, click “Write”.

    9. Verify result

      After signing and sending the query transaction, wait for the Lagrange Proof Network to process and submit the proof. Note the process on Base should cost less than 10 cents. Afterwards, return to Galxe for verification.

    10. Complete social tasks

      Complete the remainder of the social tasks on Galxe. These include becoming a Lagrange Labs Space User, following them on Twitter and referring your friends.

  • MANTRA Chain ($OM) token airdrop guide

    MANTRA Chain ($OM) token airdrop guide

    MANTRA Chain ($OM) is the first Real World Asset (RWA) Layer 1 Blockchain on the Cosmos ecosystem that ensures adherence to real-world regulatory requirements while enabling seamless participation in the evolving the RWA tokenization space for developers and institutions. MANTRA Chain has set aside 50 million $OM tokens for community airdrops. ATOM stakers and specific NFT holders will receive the allocated airdropped tokens. Additionally, MANTRA plans to double their token supply for the upcoming mainnet launch, and participants of the Hongbai Incentivized Testnet in April 2024 (and potentially others) will be eligible for the $OM airdrop. Here’s our guide to the MANTRA Chain ($OM) token airdrop.

    Check out our step-by-step guide

    https://youtube.com/live/Tjrstj87FxM
    Mantra ($OM) Hongbai Incentivized Testnet is LIVE!! (URGENT)

    What is MANTRA Chain?

    MANTRA Chain is a RWA-focused Layer 1 blockchain built to bridge the gap between traditional finance (TradFi) and decentralized finance (DeFi). Here are the main features of MANTRA chain:

    • Real World Asset Tokenization: MANTRA Chain is designed to facilitate the on-chain tokenization of RWAs. Crucially, tokenization of RWAs will have an expected valuation of US$16 trillion by 2030. This will be crucial in bridging TradFi and DeFi.
    • Security and Compliance: MANTRA Chain is a security-first Layer 1 blockchain that adheres to regulations and compliance frameworks. Their aim is to address the current ecosystem’s lack of compliance and fragmented liquidity.
    • Technical Architecture: Utilizing Cosmos SDK, MANTRA Chain offers a modular, scalable, and interoperable infrastructure for developers to build dApps and protocols, supported by the Inter-Blockchain Communication (IBC) Protocol.
    • Ecosystem and Governance: The platform integrates MANTRA Finance, MANTRA DAO, and MANTRA Chain into the Omniverse ecosystem, emphasizing regulatory compliance, community engagement, and on-chain governance.

    MANTRA Chain stands out for its focus on creating a permissionless blockchain for permissioned applications. Thereby ensuring a compliant environment for tokenization and decentralized applications within the Cosmos ecosystem.

    MANTRA has recently raised US$11 million in funding led by Shorooq Partners, a prominent venture and technology investment firm in the MENA region. Other investors include Mapleblock, Three Point Capital, Forte Securities, Virtuzone, Hex Trust, GameFi Ventures, Token Bay Capital, Virtuzone, BlackPine, Mapleblock, Fuse Capital, 280 Capital, Caladan (Alphalab Capital) and others.

    Check out our interview with MANTRA Chain CEO JP Mullin.

    How to get the MANTRA Chain ($OM) token airdrop?

    Time needed: 1 hour

    Here’s how to get the MANTRA Chain ($OM) token airdrop

    1. Sign up for the Hongbei Incentivized Testnet

      The Hongbei Incentivized Testnet will go live soon. Sign up for the waitlist HERE.

    2. Stay tuned for updates

      Follow MANTRA on Twitter to stay updated on their latest news on the incentivized testnet will go live.

    3. Stake $ATOM

      JP Mullin mentioned after our interview that $ATOM stakers could potentially qualify for the $OM token airdrop. However, the official eligibility criteria has not been officially announced yet. To stake $ATOM tokens with a Keplr wallet, go to the Keplr Dashboard. There, you can stake your $ATOM on the Cosmos Hub.

    4. Hold specific NFTS

      JP Mullin also revealed that holding certain NFTs such as Bad Kids and Pudgy Penguins may potentially qualify you for the $OM token airdrop.

    5. Participate in $OM staking pools on MANTRA DAO and MANTRAFinance

      Stake $OM tokens in the staking pools on MANTRA DAO and MANTRA Finance. This is to increase your chances of qualifying for the airdrop. There is currently a 1.35x multiplier for $OM stakers on these platforms. MANTRA DAO will discontinue $OM staking by 31st March 2024

    6. Complete Galxe quests

      Connect your wallet to the MANTRA Chain Galxe Page. Complete the social tasks and quiz. Here are the answers to the MANTRA Chain Glaxe Quiz 1: C (Cosmos), A (Real estate), D (Financing terrorism).

    $OM token staking reward mechanism

    Boxmining, including its employees, are not affiliated with and do not endorse or sponsor any token sales, initial coin offerings, initial exchange offerings and/or airdrops (the “token offerings”) unless clearly disclosed. The contents of this article are for information purposes only. Boxmining and its employees do not provide investment advice and do not take one’s personal circumstances into consideration when providing information about token offerings and cryptocurrency exchanges or platforms. In light of the above, Boxmining and its employees may hold the cryptocurrencies mentioned in this article. Please note that there are legal requirements in various countries that may restrict token offerings, and furthermore, the access to, and products and services provided by any of the cryptocurrency exchanges or platforms mentioned in this article. Consequently, the contents of this article are not directed at or intended to be accessible by persons in any jurisdiction where the extension of the availability of the materials to which you are seeking access would breach any applicable law or regulation. Decisions to participate in token offerings or to buy, sell or hold cryptocurrencies, as well as the access to and use of any cryptocurrency exchange or platform involves risk. You are also responsible for informing yourself about and observing any restrictions and/or requirements imposed with respect to any such token offerings, or the access to and use of any cryptocurrency exchange or platform. You must use your own judgment or consult a professional for advice on such matters.

  • Sanctum token airdrop guide: Sanctum Wonderland campaign guide

    Sanctum token airdrop guide: Sanctum Wonderland campaign guide

    Sanctum is a platform on Solana that aims to make staking more flexible. It wants to turn all the SOL tokens you stake into something you can easily trade, like a special kind of token called Liquid Staking Tokens (LSTs). Sanctum has officially finalised its airdrop campaign, known as Sanctum Wonderland, which is currently in Season 1. And with our guide, you can start passively earning every second! Here is our Sanctum token airdrop guide.

    Check out our step-by-step guide!

    https://youtube.com/live/2I93BZ0L_Ek
    Sanctum Airdrop is OFFICIALLY LIVE!! (So many LSTs)

    What is Sanctum?

    Sanctum is a project focused on enhancing the liquid staking ecosystem on the Solana blockchain. Here’s a brief summary of Sanctum’s main features:

    • Mission: To make all SOL staked and all staked SOL liquid, aiming for a future where Liquid Staking Tokens (LSTs) are easily accessible to everyone.
    • Core Functions: The app includes various tabs that house its core functions, designed to facilitate the issuance and investment in LSTs.
    • Developer Support: Provides technical documentation for developers interested in the project.
    • Accessibility: Strives to allow users to issue their own LSTs without liquidity concerns and to explore a wide range of LSTs for investment.

    Sanctum has recently closed a funding round led by Dragonfly Capital and other top VCs for US$6.1 million dollars.

    How to get the Sanctum token airdrop?

    Time needed: 1 hour

    Here’s how to get the Sanctum token airdrop

    1. Obtain Solana ($SOL) tokens

      Get some Solana ($SOL) tokens onto your Solana wallet. Solana ($SOL) tokens can be obtained from most major cryptocurrency exchanges such as Bybit or BingX.

      Sign up for Bybit and stand to win an iPhone 15 Pro Max HERE
      Sign up for BingX for sign up bonuses HERE

    2. Stake SOL tokens for Infinty or liquid staking tokens

      Connect your wallet to https://app.sanctum.so/infinity and stake your SOL tokens for Infinity ($INF) tokens. Infinity ($INF) tokens are a yield-bearing asset pegged to Solana. You can also stake SOL tokens for liquid staking tokens (LSTs).

    3. Swap SOL tokens for Infinty tokens

      On the same page as step 2 above, go to the “Swap” tab and swap other Liquid Staking Tokens into Infinity ($INF) tokens.

    4. Deposit Infinity ($INF) to Kamino Finance

      Connect your wallet to https://app.kamino.finance/. On the “Borrow/Lend” tab, scroll down to the INF market. Click “Supply” to deposit your Infinity ($INF) tokens. This is so you can farm points for Season 2. Note however there is a downside of no supply or borrow APY being distributed for this. This means you will not be earning yield from supplying $INF on Kamino.

    5. Deposit INF into Meteora’s DLMM Pools

      Meteora is another liquidity hub. It does not have a token yet, but there is a possibility that it may have one and do a token airdrop in the future. Meteora however has DLMM Pools for INF, which you can pair with SOL in order to farm a potential airdrop. To deposit INF into Meteora’s DLMM Pools, connect your wallet to https://app.meteora.ag/ and go to the “DLMM” tab at the top of the page. Find an INF-SOL pool to deposit your tokens. You may want to consider looking for pools to deposit that have the highest volume and TVL.

      However, when depositing onto Meteora’s DLMM Pools, be cautious of impermanent loss risks and remember to actively monitor your position.

    6. Alternative: deposit to normal pools on Meteora

      For a slightly lower risk alternative to DLMM Pools, you can consider using normal pools on Meteora. These can be found under the “Pools” tab. However, when using the normal pools, you should be aware of the Virtual Price value, which represents the value of your deposited LP token. The Virtual Price indicates if you are earning or losing money on your LP tokens. If the Virtual Price value is above 1, then you are earning from fees. For example, a Virtual Price value of 1.003 means that you are effectively earning 0.3% of the fees from this pool. On the other hand, if the Virtual Price value is less than 1, then it means you are losing money on your LP tokens.

      Note however you should still actively monitor your position on the pools you have deposited assets into on Meteora or any other protocol.

    7. NEW: Participate in Sanctum Wonderland Season 1

      To participate in Sanctum Wonderland Season 1, connect your wallet to https://app.sanctum.so/wonderland and use our code 94MIOB if you’d like. This will give us both an extra XP boost!

    8. Get a Sanctum Pet

      Sanctum has a total of 18 pets, and each LST has its corresponding Pet. To get a Sanctum Pet, you will only need to hold a minimum of 0.1 SOL worth of the corresponding LST. To get the Pet, click on its image and then “Buy”. Each Pet you own will allow you to earn 10 EXP per minute for every 1 SOL worth of the corresponding LST that you hold.

    9. Level up and evolve your Pet

      Your Pets will automatically level up as they gain EXP. The maximum level a Pet can reach is level 999. Upon reaching a certain level, Pets will evolve, and there are a maximum of 3 evolutions per Pet. This feature is coming soon so stay tuned!

  • Tensor ($TNSR) Token Airdrop Guide

    Tensor ($TNSR) Token Airdrop Guide

    Tensor is a Solana-based NFT marketplace that offers a unique fee structure to its users, similar to Blur on Ethereum. The Season 3 airdrop has ended and Tensor ($TNSR) tokens are available to claim. This is our Tensor ($TNSR) token airdrop guide.

    Tensor Airdrop Step-by-step Guide

    Here’s how to receive a potential Tensor token airdrop:

    1. Bidding, listing, and market-making on more popular NFT collections.
    2. Bidding and listing closer to the floor price.
    3. Keeping your bids and listings active as long as possible.

    See below for more details

    What is Tensor?

    Tensor is an NFT marketplace on Solana that provides better coverage, more data, and advanced order types. With a 1% taker fee and no maker fee, users can create listing, bidding, and market-making orders without incurring any charges.

    Moreover, Tensor pays full royalties on specific collections, while applying a 0% royalty rate on others. When purchasing a listed item or instantly selling to a bid, users pay the enforced royalties during the checkout process. It’s important to note that Tensor may adjust its fees and royalties in the future.

    Does Tensor have a Token?

    The Tensor ($TNSR) token is their governance token. It is used by the community to manage key parameters of the Tensor Protocols. Tensor token holders are also entitled to discounts when trading on Tensor’s protocols. Listings created in $TNSR also have a 25% reduction in protocol fee. As for their tokenomics, the team have confirmed in their FAQs that 12.5% of the Tensor token supply will be distributed in an initial airdrop.

    How to Claim Season 3 Airdrop

    Connect your wallet to the Tensor airdrop claim page HERE. Your airdrop allocation will automatically be displayed on the page. The airdrop claim will be available until 5th October 2024. The Treasure Boxes have also all been opened and the $TNSR released.

    How to Qualify for the Tensor Season 2 Airdrop?

    To qualify for the Tensor Season 2 airdrop, there are three criteria: bidding, listing, and market-making. These three activities must be done on TensorSwap only, and you can earn more points by doing the following:

    1. Bidding, listing, and market-making on more popular NFT collections.
    2. Bidding and listing closer to the floor price.
    3. Keeping your bids and listings active as long as possible.

    Market-making is perhaps the easiest of the three options, as any bid that is accepted will be automatically converted into a listing, and any listing that is accepted will be automatically converted into a bid. As an added bonus, you can earn fees in the process!

    But if you are bidding and listing on TensorSwap and they are taken, it will stop earning points. Additionally, it is important to note that the following actions won’t earn you any points:

    1. Bidding and listing too far away from the floor price.
    2. Bidding and listing on obscure NFT collections.
    3. Wash trading (buying and selling NFTs to themselves).

    Tensor season 3 airdrop eligibility criteria

    Tensor season 3 airdrop participants will be distributed Treasure Boxes. These Treasure Boxes contain an amount of Tensor ($TSNR) tokens proportional to the users’ use of Tensor’s protocols.

    How to get the Tensor ($TNSR) season 4 airdrop

    How to get the Tensor ($TNSR) season 4 token airdrop

    1. Bid

      Connect your Solana wallet (e.g. Phantom wallet) to https://www.tensor.trade/. Find an NFT collection you would be interested in and click. Choose the NFT you wish to buy or bid. As you may earn more points for more trades, it is recommended to so several trades.

    2. Sell NFTs

      To list NFTs on Tensor, go to the “Sell” tab. You have the option to choose “Sell now,” which allows you to immediately sell any NFTs you own for SOL if there is an open collection-wide bid. To quick sell, hover over the NFT and click “sell”, then confirm the transaction. Another option is the bulk sell mode. To bulk sell, use the slider or click on the NFTs to select which ones you wish to sell. Click on the “Sell” button which will also show you your total sell proceeds, and confirm the transaction.

    3. List NFTs

      Listing NFTs on Tensor has 2 main benefits. First, the total fees are capped at 1.4% taker fee plus royalties if enforced. Secondly, you can sell on Bonding Curves. This means you can sell the 1st NFT for X SOL, the 2nd NFT for X + Y SOL, and the 3rd NFT for X+2Y SOL etc. This allows you to receive more for your NFTs as the price increases automatically.

      To list on Tensor, click on the “List” tab. Set the number of NFTs you would like to list for sale, you can choose between listing in bulk by using the slider or select each NFT individually from the gallery. Then, specify the starting price i.e. the price you want to sell your 1st NFT for. You can then specify the “increase by” or “delta”, which is the amount of price increase after each NFT purchase. For example, if you set the starting price for the NFT at 4.5 SOL and specified an increase of 0.5 SOL, the first NFT sale will occur at 4.5 SOL, the second at 5.0 SOL, the third at 5.5 SOL, and so on until all the NFTs have been sold. Before signing the transaction, the system will display the exact amount of SOL you would receive if you were able to sell all the NFTs you are listing.

    4. Market-make

      To market-make on Tensor, toggle to Pro Mode at the bottom of the TensorSwap interface. Then, click on the “Trade” tab on the top left hand corner, then go to the “Market-make” tab. Set the maximum number of NFTs you want to buy initially and deposit enough SOL to cover this purchase. Select the NFTs from your wallet that you are willing to sell and set the starting price. The starting price is the price you intend to start selling your first NFT and will be the benchmark for subsequent price changes. Set the price change mechanism, i.e. the amount of price change (in SOL or %) after each buy or sell transaction. Next, set the desired fee, this is the fee percentage you wish to earn from the spread between the buy and sell prices. Check the summary to see the amount of SOL needed for buying NFTs and your potential earnings from selling your NFTs. Finally, sign the transaction in your wallet and send your market-making order to star trading.

      Note, be aware of impermanent loss and do not deposit rare NFTs into market-making orders.

    5. Use price lock

      Tensor’s price lock feature allows users to “lock-in” a buy or sell price for 7 days. With price locks, you can either be the taker (i.e. to buy the price lock) or a maker (i.e. to fund the price lock).

    Airdrop Review

    When reviewing an airdrop, there are several factors to consider. First, the likelihood the project will even do an airdrop in the first place. Then, to look at how many tokens the project intends to allocate towards airdrop campaigns, as well as the difficulty in participating in their airdrop. It is also important to look at the utility of the token so that there will be an actual use and purpose in participating in the airdrop in the first place. Finally, a factor to consider when reviewing an airdrop is whether the airdropped tokens are subject to any lockup period.

    Likelihood of Airdrop: Tensor has confirmed a Season 2 airdrop and is now live.

    Airdropped Token Allocation: 12.5% of the Tensor token supply will be distributed in an initial airdrop.

    Airdrop Difficulty: It is recommended to position yourself for this airdrop only if you have experience trading Solana NFTs. This is because you will be trading with real NFTs and funds.

    Token Utility: The Tensor team has not yet published details of the token’s utilities. But it is likely to be similar to Blur, used for governance of the marketplace.

    Token Lockup: No tokenomics available yet.

  • Avail token airdrop guide

    Avail token airdrop guide

    Avail ($AVAIL) is a new technology that allows developers to create their own blockchains with more speed, security, and flexibility. Avail will be launching their mainnet very soon, which means their Goldberg Incentivized Testnet will be ending soon, so do not miss out! Here’s our Avail ($AVAIL) token airdrop guide.

    Check out our step by step guide:

    https://youtube.com/live/Lo3_zJHuFvk
    Avial incentivized testnet airdrop guide

    What is Avail ($AVAIL)?

    Here is a summary of what Avail is and their main features based on the information on this page:

    • Avail: A fast and secure data and consensus layer that provides a foundation for building next-generation, trust-minimized applications.
    • Modularity: Avail supports any blockchain execution environment, allowing developers to customize, scale, and adapt their blockchains to any modular stack.
    • Sovereignty: Avail enables chains to become sovereign, meaning they have full control over their state and logic, and can update them without redeploying a smart contract.
    • Shared Security: Avail inherits the security of its base layer validator set, which uses cutting-edge math to ensure data availability and correctness.

    Will there be an Avail ($AVAIL) token airdrop?

    The Avail Goldberg Incentivized Testnet (also known as the Clash of Nodes) campaign has been live since November 2023. Avail will be launching its mainnet sometime this quarter. So it is likely Avail will do an airdrop soon!

    How to get the Avail ($AVAIL) token airdrop?

    Here’s how to get the Avail ($AVAIL) token airdrop

    1. Connect to the Avail Goldberg testnet

      Connect to https://goldberg.avail.tools/#/accounts using your Polkadot wallet such as SubWallet. If you do not have a Polkadot wallet, the page will give you a public address and a mnemonic seed phrase to create one right on the page!

    2. Access testnet faucet

      Join the Avail Discord and head to the #faucet-access channel. Note you will need a Gitcoin Passport with over 20 points. Then, go to https://passport-verifier.avail.tools/, connect your Discord and submit your Gitcoin Passport. Then click “Give role”.

      Return to Goldberg and copy the address of the account that you created. Return to Discord, go to #goldberg-faucet and type “/deposit”. Then paste your address and you will get 5 $AVAIL for doing this. You can use the faucet every 3 hours and we suggest to return to get more testnet $AVAIL testnet tokens often because you will need a lot of them to complete tasks.

    3. Set up on-chain identity

      Go to the Goldberg testnet website and click on the ‘Set On-Chain Identity’ option. Enter your information, such as email, Twitter, Discord, etc. Note that this action requires 10 $AVAIL tokens.

    4. Stake $AVAIL tokens

      To stake your AVAIL tokens on the network, go to the ‘Network’ section on the Goldberg testnet website, select ‘Staking’, and join a pool with fewer than 100 participants.

      Stake at least 10 AVAIL tokens in the pool. Remember you can claim more testnet tokens from the faucet every 3 hours to have enough for staking.

    5. Complete Avail’s Light Client Lift-Off challenge and claim the participation NFT

      To complete Avail’s Light Client Lift-Off challenge, connect your wallet to https://lightclient.availproject.org/ and complete the social tasks. Afterwards, mint the participation NFT.

  • Venom ($VENOM) Token Airdrop Guide: 25 March listing!

    Venom ($VENOM) Token Airdrop Guide: 25 March listing!

    Venom Foundation have launched a $1 billion fund to invest in Web3 and blokchain firms. And is launching a layer-0 blockchain that will function as the main infrastructure for a global ecosystem of Web3 applications. According to their whitepaper, 22% of the initial token supply will be allocated to the community. This is very likely to be an airdrop to early users. Venom has launched their mainnet on 18th March 2024 and their $VENOM token will be listed on 25th March 2024! Here is our Venom token airdrop guide.

    Check out our video on the latest news and predictions for the upcoming potential Venom token airdrop!

    https://www.youtube.com/watch?v=fl_Sz53_038

    What is happening to Venom?

    On 16th December 2023, Venom Foundation announced on Twitter as of 14th December 2023, they will no longer continue operating in ADGM (Abu Dhabi Global Market). Therefore, Venom Foundation will begin the dissolution process. They have however, mentioned that they are open to exploring future opportunities within ADGM. However, it does mean that it is unlikely there will be a Venom airdrop in the foreseeable future.

    Step-by-Step Venom Testnet Guide

    What is Venom Foundation?

    Venom Foundation is a new layer-0 blockchain that envisions a global economy built on decentralized, blockchain-based, financial systems. They are a new player in the financial application-specific blockchain (appchain) space, offering real-world assets (RWA) with the transparency of a blockchain. They are fully regulated by financial authorities in Abu Dhabi.

    The architecture of Venom Foundation is essentially a modular blockchain that is built on its own Threaded Virtual Machine (TVM). This allows for the efficient execution of smart contracts through an asynchronous communication model as well as dynamic sharding.

    In theory, the Venom blockchain can handle interactions between accounts more effectively than EVM-based networks, allowing for greater parallelism and reduced delays. As the network experiences heavy loads, validators divide into parallel groups and handle transactions through “split events.” As such, their mission is to be the infrastructure for the next generation of digital services and products.

    Does Venom Foundation have a Token?

    $VENOM, the native currency of the Venom blockchain, serves multiple purposes. It is used to pay transaction fees, which helps maintain the network and compensate validators. Additionally, it secures the network through a proof-of-stake mechanism and allows network participants to support validators via DePools staking.

    According to their whitepaper, the $VENOM token has no fixed maximum supply. It has an inflationary model, with a projected annual inflation rate of 1%. However, the Venom Foundation is exploring ways to transition to a deflationary model. It is worth noting that 22.0% of the tokens will be allocated towards the community, and 10% will be unlocked at TGE.

    Venom have confirmed their $VENOM token will be listed on 25th March 2024 on Bybit, OKX, MEXC, gate.io, Poloniex and Web3.world.

    Sign up for Bybit here!

    How to Get $VENOM Token Airdrop?

    The best way to get the $VENOM airdrop is to interact with the Venom Network Testnet. Here’s a step-by-step guide:

    1. Create a Venom Wallet

      Go to the Venom Network Testnet, and install a Venom Wallet (Chrome users can download here). Pin the wallet to your Google Chrome Extension at the top right.

      Connect your Twitter account to your Venom wallet to claim 50 testnet $VENOM tokens.

    2. Claim Testnet $VENOM Tokens

      Go to the Task page and log in with your Venom Wallet. Connect your wallet, Twitter account and follow Venom Foundation to claim 50 testnet $VENOM.

      You can also claim additional testnet tokens by completing other tasks on the Faucet page. You will be required to complete various tasks to claim additional testnet Venom.

    3. Complete Venom Foundation tasks

      On the task page, follow Venom Foundation on Telegram and subscribe to their YouTube Channel. Once that’s done, you can claim your NFT by clicking “Mint NFT”.

    4. Complete Venom Wallet tasks

      Go to the task page. Send at least 1 VENOM token to 0:077873f1453fa67b0f1ce77f1e806675acd19c4694b9738be61fd406618f2f7a. Then, click “Mint NFT”.

    5. Complete Web3.World tasks

      On the task page, join the Web3.World Telegram Channel and swap any token available on testnet.web3.world to any other tokens. Then mint the NFT.

    6. Use Venom Bridge

      Go to the task page. Join the Venom Bridge Telegram channel. Then, transfer tokens from Venom to EVM chains. First, go to https://testnet.venombridge.com/bridge and connect your Venom and EVM (e.g. Metamask) wallets. In the “From” and “To” fields, select “Venom Testnet” and “Binance Smart Chain” respectively. Select the amount of Venom tokens you want to transfer and turn off the “Swap TVENOM to pay BSC gas” option. Click “Continue”, then approve the transaction. Then, go to the “History” tab, click “Only My” and find that transaction. Click on the transaction and “confirm” to release transfer in Binance Smart Chain. Afterwards, do the transaction in reverse, i.e. swap from Binance Smart Chan to Venom Testnet.

    7. Claim Snipa Finance NFT

      Go to the task page and complete the tasks to claim your free Snipa Finance NFT! Full guide here.

    8. Stake Venom

      Go to the task page. Connect your Venom wallet to https://testnet.venomstake.com/. Then choose the amount you wish to stake and click “Stake”. You can also unstake your Venom at any time by going to the “Unstake” tab, choosing the amount you wish to unstake and clicking “Unstake”. On the task page, click “check”, you may need to wait a few minutes after the task has been completed before the checking will be sucessful. Finally, mint the NFT.

    9. Trade NFTs on Oasis Gallery

      Find the instructions on the task page. Oasis Gallery is a NFT marketplace on Venom. Buy any NFT on Oasis Gallery here. Click on the NFT you wish to buy, connect your Venom wallet, click “Buy now” and confirm the transaction. Then go back onto the task page and click “Check”. Now, list your NFT for sale on Oasis Gallery by going to their website and going to the “My NFTs” tab. Click on your NFT and “Put for sale”. Choose your sale price and confirm the transaction. Return to the task page and click “Check” and finally, mint your NFT.

    10. Complete VenomPad tasks

      Go to the task page. Follow and Tweet about VenomPad. Click “Check” once each of the the tasks have been completed. Mint the NFT.

    11. Buy NFT on Nümi

      Go to the task page. Watch the video, tweet about Nümi and buy any NFT on Nümi.

      If you made a Venom Wallet before June 2023, you should receive Nümi token airdrops. Click the refresh button at the bottom part of your wallet to see it. If you don’t have any Nümi tokens, you can swap them at Web3.World with VENOM tokens. Once you have some Nümi tokens, you can buy an NFT on the Nümi Marketplace after signing up for an account. Finally, mint the NFT.

    12. Mint Ylide NFT

      Go to the Ylide task page. Post about Ylide on Twitter. Then, connect your Venom wallet to https://hub.ylide.io/feed/venom and post an on-chain message. Finally, mint your Ylide NFT.

    13. Complete Gravix tasks

      Go to the task page. Follow Gravix on Twitter. Then, connect your Venom wallet to https://app.gravix.io/ and open a long/short position. However, you will need USDT to open a position. If you do not have any USDT in your Venom wallet, go to https://testnet.web3.world/swap and swap some $VENOM for $USDT first. Lastly, mint your NFT.

    14. Collect Qamon NFT

      Go to https://venom.network/tasks/qamon. Follow Qamon on Twitter and send an on-chain mail on https://app.qamon.io/. Then, mint the NFT.

    15. Burn Venom

      Go to the Venom Burn task page. Follow Venom Burn on Twitter. Then, go to https://testnet.venomburn.com/ and burn any amount of VENOM for any project. Mint your NFT.

    16. Complete OneArt tasks

      Go to the OneArt task page. Follow OneArt on Twitter. Then, download the OneArt mobile app here and import your Venom Wallet using your seed phrase. If you have at least 3 VENOM, a window will pop up asking you to Mint your NFT, click “Mint”. Once you have minted your OneArt Welcome NFT, go back to the task page and mint your other NFT.

    17. Complete Valicit tasks

      Go to the Valicit task page, follow Valicit on Twitter, buy a ticket and mint their NFT.

    18. Wrap $VENOM tokens

      Visit the Swap page. Choose VENOM and WVENOM tokens, and the amount. Then click “Wrap VENOM” and approve your transaction.

    19. Provide liquidity

      Go to “Liquidity Providing” and click “Add Liquidity”. Then, connect pool and approve the transaction, set the amount you wish to add and continue. Next, deposit your tokens and confirm the transaction in the wallet. Then, click “Supply tokens” and approve the transaction.

    20. Deposit into farming pools

      Go to the “Farming” tab, choose the USDT/WVENOM pool. Then, enter the amount you want to deposit and select the lock-up period. Click the deposit button and approve the transaction in your Venom Wallet when prompted.

    21. Complete Everplay tasks

      Go to the Everplay task page. Follow @everplaygg on Twitter. Then, buy a Venom Pass for 0.05 $VENOM (note this is testnet Venom and won’t require you to use real funds). Finally, mint your NFT.

    22. Complete Chainspot tasks

      Connect your wallet to the Chainspot task page. Follow @chainspotIO on Twitter. Then, connect your Metamask wallet to Chainspot (make sure you are connected to BSC Chain) and click “Claim” in order to Claim 10 $CST tokens. Transfer any amount of CST tokens from BSC Chain to Venom Testnet. Finally, mint your NFT.

    23. Complete Segmint tasks

      Go to the Segmint task page. Follow @segmintapp on Twitter. Next, mint any segment on segmint.app by finding an empty seat and clicking “Mint segment”. This will cost 0.49 testnet $VENOM. Finally, mint your NFT.

    24. Post screenshot and wallet address on Venom Discord

      Post a screenshot of your NFT achievements together with your wallet address on the Completed-tasks channel on Venom’s Discord.

    25. Complete Ventory tasks

      Go to https://venom.network/tasks/ventory. Follow Ventory on Twitter and mint a NFT on https://ventory.gg/ino/ventoryonvenom. Finally, mint the Ventory NFT.

    26. Complete tasks and collect NFT rewards

      Connect your wallet regularly to https://venom.network/tasks. Complete any new tasks, there will be more coming soon! Since the tasks are relatively easy to complete, we believe that users may have to collect all 24 NFTs in order to qualify for the Venom token airdrop.

    27. Where can I trade $VENOM tokens?

      $VENOM tokens can be traded on Bybit, OKX, MEXC, gate.io, Poloniex and Web3.world.

      Sign up for Bybit here!

    How to mint Venom NFTs

    You can mint Venom NFTs as rewards for using the Venom testnet and represent your engagement with the ecosystem. They could be the key to getting airdrop rewards in the future! Here’s a step-by-step guide:

    1. Go to https://venom.network/tasks, and click “Complete tasks”. Follow Venom Network on Twitter and tweet about the Venom Testnet. Then click “Mint” to mint your Venom NFT.
    2. You will then need to send any amount of Venom tokens to their address. Once you have done so, click “Check” and you can now mint your NFT.

    Airdrop Review

    When reviewing an airdrop, there are several factors to consider. First, the likelihood the project will even do an airdrop in the first place. Then, to look at how many tokens the project intends to allocate towards airdrop campaigns, as well as the difficulty in participating in their airdrop. It is also important to look at the utility of the token so that there will be an actual use and purpose in participating in the airdrop in the first place. Finally, a factor to consider when reviewing an airdrop is whether the airdropped tokens are subject to any lockup period.

    Likelihood of Airdrop: Based on recent events, Venom Foundation is unlikely to do an airdrop.

    Airdropped Token Allocation: 22% of the initial token supply will be allocated to the community. However, it is unlikely that Venom would do an airdrop.

    Airdrop Difficulty: The Venom Testnet page is very UI-friendly. It shows you the tasks you can complete for each DApp!

    Token Utility: $VENOM will be used to pay for transaction fees to maintain the network by validators, secure the network through proof-of-stake mechanisms, and support validators by network participants through DePools staking.

    Token Lockup: Of the initial supply of 7.2 billion $VENOM, 15.5% will be available to use, while 84.5% will remained locked. The locked tokens include 10% of the initial supply as a stake of early validators. However, it is unlikely that Venom would do an airdrop.

  • Dymension ($DYM) Token Staking Guide: 1000+ airdrop guide!

    Dymension ($DYM) Token Staking Guide: 1000+ airdrop guide!

    Dymension ($DYM) comprises a network of swiftly deployable and high-speed modular blockchains known as RollApps. The projects have just finished their airdrop, and those who had just staked 1 Celestia ($TIA) tokens were able to get thousands of Dymension ($DYM) tokens! However, even if you did not manage to get the Dymension ($DYM) token airdrop, it is still worth getting some tokens so you can stake it. This is to position yourself for more airdrops in the future just like Celestia! Here is our Dymension ($DYM) token staking guide for MORE airdrops!

    Check out our Dymension ($DYM) Token Staking Guide!

    https://youtube.com/live/VXYrqBwUk1A

    And check out our other video on other airdrop rewards offered to Dymension ($DYM) stakers HERE.

    What is Dymension ($DYM)?

    Dymension is a groundbreaking blockchain network characterized by its modular blockchains known as RollApps. These RollApps serve as the front-end, offering users a platform for diverse applications such as games, decentralized finance (DeFi), and NFTs. Central to its operation is the Dymension Hub, akin to a back-end server, which orchestrates network activities, manages requests from RollApps, and ensures cohesive functionality within the ecosystem. In its architecture, Dymension incorporates Data Availability Networks via Celestia, paralleling the role of databases in traditional web setups. These networks provide temporary data storage, enhancing efficiency and adaptability. Complementing this structure is the Dymension RollApp Development Kit (RDK), based on the Cosmos SDK. This kit facilitates the creation of RollApps, offering essential tools and pre-built modules for developers to efficiently build and deploy their applications, each with distinct client and server components. Dymension distinguishes itself through its innovative consensus mechanism and interoperability features. RollApps delegate the consensus process to the Dymension Hub, which maintains network integrity and manages state root updates. This delegation enables rapid transaction processing and high transaction throughput. Furthermore, the network’s design promotes smooth interoperability within the Cosmos ecosystem through the Inter-Blockchain Communication (IBC) protocol, fostering a connected and collaborative ecosystem.

    How to stake Dymension ($DYM) tokens for more airdrops

    Time needed: 15 minutes.

    Here’s our guide on how to stake Dymension ($DYM) tokens for more airdrops.

    1. Get Dymension ($DYM) tokens

      Claim your Dymension ($DYM) tokens. If you missed the airdrop, you can still buy Dymension ($DYM) tokens on exchanges such as Bybit.

      Sign up for a Bybit account here!

    2. Connect to Dymension portal

      Connect your wallet (either MetaMask, Leap, Trust or Keplr wallets) to the Dymension portal at https://portal.dymension.xyz/dymension/staking. Also follow the steps to add the Dymension network to your wallet.

    3. Choose a validator to delegate your Dymension ($DYM) tokens

      Choose a validator to delegate your Dymension tokens to. Avoid picking validators associated with centralised exchanges, those will have the exchange in its name. We suggest delegating your Dymension ($DYM) tokens to the ValiDAO validator because they announced a ValiDAO ($VDO) token airdrop to all address who delegate their $DYM with their validator!

      We also suggest delegating your Dymension ($DYM) tokens to the Enigma and Frens validators. Essentially, it is a good idea to delegate your Dymension ($DYM) tokens to validators with their own DAO because they are likely to make their own DAO token and airdrop it to you as a reward.

    4. Delegate your Dymension ($DYM) tokens

      Once you have chosen your validator, click “Stake”, select the amount of $DYM you wish to stake and click “Stake”. Note that staking will lock up your tokens for 21 days. To access your staked tokens again, you will need to go through the un-staking process.

    5. Keep track of your validators

      Keep track of any announcements from the validators you have delegated your $DYM with. Follow their Twitter, Discord and Telegram pages for any announcements regarding additional airdrops.

    6. Check if you qualify for NIM Network airdrops

      NIM Network have announced that all $DYM token stakers will be eligible to claim The Nim Genesis Drop, and can claim up to 50 million $NIM (i.e. 5% of the total supply). You can check if you qualified for the $NIM airdrop by going to https://claim.nim.network/ and entering your Dymension wallet address. If you do qualify, the $NIM tokens will automatically be airdropped to your Dymension wallet at TGE.

    7. Stay up to date on the potential Aigisos ($AIG) airdrop

      Aigisos ($AIG) is a RollApp focusing on security, and have been selected by Microsoft for Startups. The team have confirmed that 12% of the $AIG supply will be airdropped to $DYM token stakers as Genesis RollDrop. The $AIG tokens will be distributed during the mining of the Aigisos genesis block, which is expected to be in H1 of 2024. No further details have been released yet. So, follow Aigisos on Twitter to make sure you have the latest airdrop news.

    8. Complete Rivals Network ($RIZ) Galxe tasks

      Rivals Network ($RIZ) is an AI-driven Data Provenance DePIN RollApp built on Dymension and powered by Celestia. The team have already confirmed they will have a $RIZ token and are likely to do a token airdrop. This is because Rivals Network ($RIZ) has a Galxe page where you can complete various social tasks to mint an OAT.

    9. Check eligibility for Dogmond ($DGM) airdrop

      Dogmond ($DGM) is a memecoin similar to ChihuahuaChain ($HUAHUA). However, instead of being built on a blockchain, Dogmond will be built on a RollApp powered by Dymension. Dogmond have confirmed that 40% of their token supply will be allocated to $DYM stakers as a reward for their contribution towards network security and engagement. You can check your eligibility by pasting your wallet address HERE.

    Frequently asked questions (FAQs)

    Which Dymension Validator to pick for MORE AIRDROPS?

    We suggest the ValiDAO validator because they announced a ValiDAO ($VDO) token airdrop to all address who delegate their $DYM with their validator.

    How to find the best Dymension Validator to get more airdrops?

    The best Dymension validators are those with their own DAO. This is because they are likely to make their own DAO token and airdrop it to you as a reward. We suggest you follow their social media channels closely to get the latest news on any airdrop announcements.

    How many Dymension ($DYM) tokens do you need to stake for airdrops?

    The amount of Dymension ($DYM) tokens to stake for airdrops depends on the validator. Each validator will have their own airdrop eligibility criteria.

  • EigenLayer ($EIGEN) token airdrop guide: How to claim?

    EigenLayer ($EIGEN) token airdrop guide: How to claim?

    Eigenlayer is a protocol built on Ethereum that helps people who own Ethereum to keep their money safe and earn more rewards. With EigenLayer, people can use their Ethereum to help many different services stay safe at the same time. EigenLayer have already taken the airdrop snapshot, announced the eligibility criteria and claim details. Here’s our guide explaining the eligibility criteria and how you can claim the EigenLayer token airdrop.

    Eigenlayer Airdrop: Most Disappointing Airdrop SO FAR?!

    Check out our step-by-step guide!

    What is EigenLayer?

    EigenLayer is a protocol that introduces a new primitive in cryptoeconomic security called restaking. This primitive enables users to reuse their ETH on the consensus layer and extend cryptoeconomic security to additional applications on the network. Users who stake ETH natively or with a Liquid Staking Token (LST) can opt-in to EigenLayer smart contracts to restake their ETH or LST and earn additional rewards.

    What is interesting about EigenLayer is that they have raised $50 million in Series A funding led by Blockchain Capital. Other notable investors include Finality Capital, Electric Capital, Polychain Capital, Hack VC and Coinbase Ventures. With Coinbase Ventures backing EigenLayer, there is strong speculation that their token will be listed on either Coinbase or Binance.

    How to get a potential EigenLayer token airdrop if deposits are paused

    To get the potential EigenLayer token airdrop, simply connect to https://app.eigenlayer.xyz/ and connect your wallet. Then, click into your preferred pool, enter the amount of tokens you wish to deposit and click “Deposit”.

    However, Liquid Restaking deposits are currently paused on EigenLayer because it is full. They sometimes reopen, but when it does, it is only for a few hours at a time. So it is importantly to SUBSCRIBE to Boxmining+ because we will be the first to let you know when it does!

    There is an alternative solution to getting the potential EigenLayer token airdrop if liquid restaking deposits are full. However, there is a risk of using Ether.fi as a backdoor to getting into the EigenLayer token airdrop. This is because EigenLayer has not officially supported this as an alternative to getting the EigenLayer token airdrop.

    Here’s how to get a potential EigenLayer token airdrop if EigenLayer deposits are paused:

    1. Connect to Ether.Fi at https://www.ether.fi/.
    2. Use referral for EXTRA POINTS by clicking HERE.
    3. Stake ETH: Choose the amount of ETH you wish to deposit and click “Stake”. But make sure the transaction fees are not expensive when staking. This is because they could be more than what you may potentially get from this airdrop.
      You will get eETH when you stake ETH on Ether.fi.
    4. Earn rewards: You will earn the following rewards for staking on Ether.fi: APR, restaked APR, ether.fi loyalty points and Eigenlayer points.
    5. Withdraw staked ETH: Withdraw your eETH on the “Stake” tab. Note it takes around 7 to 14 days. Or if you don’t want to wait 7 to 14 days, you can immediately swap your eETH for an alternative cryptoasset using any DEX. However, you will need to pay exchange fees for this.

    How to qualify for potential Eigenlayer airdrop: Cheapest method, no Ethereum

    Time needed: 1 hour

    Here’s how to get a potential EigenLayer token airdrop if EigenLayer deposits are paused:

    1. Withdraw Ethereum to Manta

      Withdraw Ethereum on your centralized exchange account (e.g. Binance) to MetaMask using the Manta network. This is because it is extremely cheap to do this. For instance, Binance charged us 0.0001 ETH (around US$0.35) for this transaction, versus 0.003 ETH (around $10.48) for doing the same transaction using the Ethereum network. Note we chose the Manta network so we can get extra rewards on the Manta Renew Paradigm campaign. However, you can also use other networks such as Arbitrum, Base and Optimism.

      Learn more about the Manta Renew Paradigm and our step by step guide HERE.

    2. Join Manta’s New Paradigm

       You need an invite to join Manta’s Renew Paradigm. Use the invite code HERE.

    3. Swap ETH for STONE

      You will need STONE in order to stake on Manta. To get STONE tokens, connect your wallet to https://app.aperture.finance/swap?chainId=169 and swap your ETH to STONE. Note, do not swap all your ETH as you will need some ETH to pay for upcoming transaction costs.

    4. Stake STONE on protocols

      On the staking dashboard, select your validator and stake your ETH. Make sure that you select a validator that offers Eigen Layer Points. For example Shoebill, LayerBank and ZeroLend offer LayerBank/ Shoebill/ ZeroLend rewards, Manta rewards, Stone Stake ETH rewards and Eigen Layer Points. You can choose to stake all your ETH on one or split your ETH between several protocols. We chose which protocol to supply and stake our STONE depending on the Supply APY offered. You can check the Supply APY on the protocol’s page. As at the time of writing, Shoebill offers 4.53% and ZeroLend offers 0.012% Supply APY. Whilst LayerBank offers 3.46% Supply APR.

      See steps 5-6 for supplying and staking STONE on Shoebill.
      See steps 7-8 for supplying and staking STONE on ZeroLend.
      See steps 9-10 for supplying and staking STONE on LayerBank.

      Note that token unstaking on Manta New Paradigm will only be enabled in May 2024.

    5. Supply STONE on Shoebill

      Connect your wallet to https://manta-stone.shoebill.finance/#/ and click on the “STONE” market. Uder the “Supply” tab, choose the amount of STONE you wish to supply and confirm the transaction. This will give you sbSTONE.

    6. Stake sbSTONE on Manta

      Go to the Manta Renew Paradigm staking dashboard and click on the down arrow under Shoebill. Stake your sbSTONE to get Shoebill rewards, Manta rewards, Stone Stake ETH rewards and Eigen Layer Points. Note that token unstaking on Manta New Paradigm will only be enabled in May 2024.

    7. Supply STONE on ZeroLend

      Connect your wallet to https://app.zerolend.xyz/. Click the down arrow to change to the Manta market. Click on “StakeStone Ether”. Choose the amount of STONE you wish to supply and click “Approve STONE to continue”. This will give you z0STONE.

    8. Stake z0STONE on Manta

      Go to the Manta Renew Paradigm staking dashboard and click on the down arrow under ZeroLend. Stake your z0STONE to get Zerolend rewards, Manta rewards, Stone Stake ETH rewards and Eigen Layer Points. Note that token unstaking on Manta New Paradigm will only be enabled in May 2024.

    9. Supply STONE on LayerBank

      Connect your wallet to https://manta.layerbank.finance/bank. Click “STONE” under Markets. Choose the amount of STONE you wish to supply and click “Supply”. This will give you lSTONE.

    10. Stake lSTONE on Manta

      Go to the Manta Renew Paradigm staking dashboard and click on the down arrow under LayerBank. Stake your lSTONE to get LayerBank rewards, Manta rewards, Stone Stake ETH rewards and Eigen Layer Points.

    EigenLayer token airdrop guide

    AltLayer airdrop for EigenLayer restakers and ecosystem partners: How to claim?

    AltLayer announced details of their Airdrop Season 1. A total of 300 million $ALT tokens (i.e. 3% of the total supply) will be airdropped. They have taken a snapshot at 12:00:11 on 17th January 2024 (UTC), and the AltLayer airdrop will be available to claim from 25th January to 25th February 2024. Of the $ALT tokens to be airdropped, 13.05% (i.e. 39.15 million) $ALT will be airdropped to EigenLayer Restakers. And 4.49% (i.e. 13.47 million) $ALT will be distributed to EigenLayer Ecosystem Partners.

    For EigenLayer Restakers, you must have at least 720 Restaked Points to be eligible for the AltLayer airdrop.

    AltLayer $ALT token claims are now open and can be claimed HERE. To claim your airdrop, enter your Ethereum address and click “Check”.

    EigenLayer airdrop eligibility criteria

    The EigenLayer token airdrop snapshot was taken at Block #19437000, on 15th March 2024, at 01:11:35 UTC.

    EigenLayer has announced there are 2 airdrop seasons. In particular, Season 1 will be split into 2 phases. In Phase 1, 90% of Season 1 tokens will go to those who staked directly in EigenLayer or via Liquid Restaking Tokens (LRTs). For Phase 2, the remaining 10% of Season 1 tokens may go to those who engaged with EigenLayer in more intricate ways, where identifying the appropriate EigenLayer end user was either impossible or necessitated a subjective judgment.

    EigenLayer have confirmed there will be they will give an additional 100 $EIGEN to all users who have interacted with EigenLayer before 29th April 2024 and passed the Sybil filtering. Therefore, Season 1 airdrop participants will receive a minimum of 110 $EIGEN (i.e. a floor amount of 10 $EIGEN plus the additional 100 $EIGEN). Meanwhile, Season 2 participants who started staking between 15th March and 29th April 2024 will also receive a minimum of 100 $EIGEN.

    How to claim your EigenLayer airdrop?

    To check your eligibility for the EigenLayer token airdrop, click HERE and enter your EVM wallet address. You can then claim your EigenLayer token airdrop on 10th May 2024. HOWEVER, airdropped $EIGEN will be unlockable (i.e. non-transferrable) until new features are live and further decentralization is achieved. This is targeted to be on 30th September 2024.

    EigenLayer airdrop review

    When reviewing an airdrop, there are several factors to consider. First, the likelihood the project will even do an airdrop in the first place. Then, to look at how many tokens the project intends to allocate towards airdrop campaigns, as well as the difficulty in participating in their airdrop. It is also important to look at the utility of the token so that there will be an actual use and purpose in participating in the airdrop in the first place. Finally, a factor to consider when reviewing an airdrop is whether the airdropped tokens are subject to any lockup period.

    Likelihood of airdrop: The EigenLayer airdrop is now live. Participants are already doing tasks and getting points!

    Airdropped token allocation: The EigenLayer airdrop allocation is unknown.

    Airdrop difficulty: The EigenLayer airdrop requires users to deposit ETH onto their platform. But deposits are currently closed. We have an alternative which is to deposit on Ether.fi instead, but EigenLayer have not confirmed this is an official method to getting their token airdrops.

    Token utility: The EigenLayer token utility is unknown.

    Token lockup: There is no information on the EigenLayer token lockup yet.