
MetaMask is a secure crypto wallet to store and manage your Ethereum (ETH) and other ERC-20 tokens. It is also a gateway to other decentralized applications. This is beneficial for people who frequently use ETH and its tokens as it provides a secure and fast way to access their funds. This guide is a MetaMask tutorial for complete beginners. We will learn how to:
- Set up a MetaMask account.
- Deposit to MetaMask.
- Send funds from MetaMask.
- Change and add networks in MetaMask.
- Use MyEtherWallet with MetaMask.
- Fiat on-ramps: Buy Crypto Using Debit or Credit Cards.
- Withdraw money or cryptocurrencies from MetaMask.
- Collect airdrops using MetaMask.
- Cash out your crypto to fiat using MetaMask.
You can also follow me as I walk through the steps in my video:
What’s more, there are rumors that MetaMask might also do a $MASK airdrop! Learn how to get some of that potential airdrop with our MetaMask ($MASK) Token Airdrop Guide!
How to set up a MetaMask account
Here’s how to set up a MetaMask account:
- Download and install MetaMask.
- Create a new wallet.
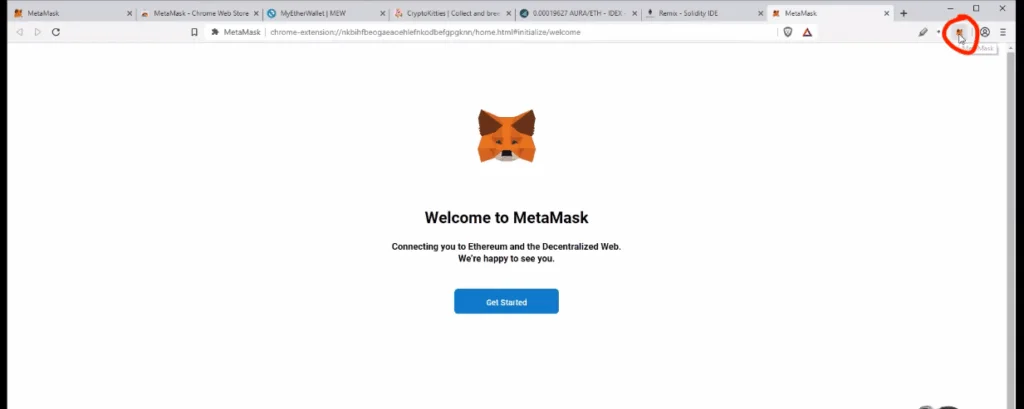
Download and install Metamask extension
Download MetaMask. MetaMask has extensions for Chrome, Firefox, Opera, Edge and Brave browsers. At the extension store on these browsers, search for MetaMask and click “Add to” browser. Alternatively, installe the MetaMask mobile from the iOS App Store or Google Play Store.
Once installed, the MetaMask icon will appear on the top right-hand corner.
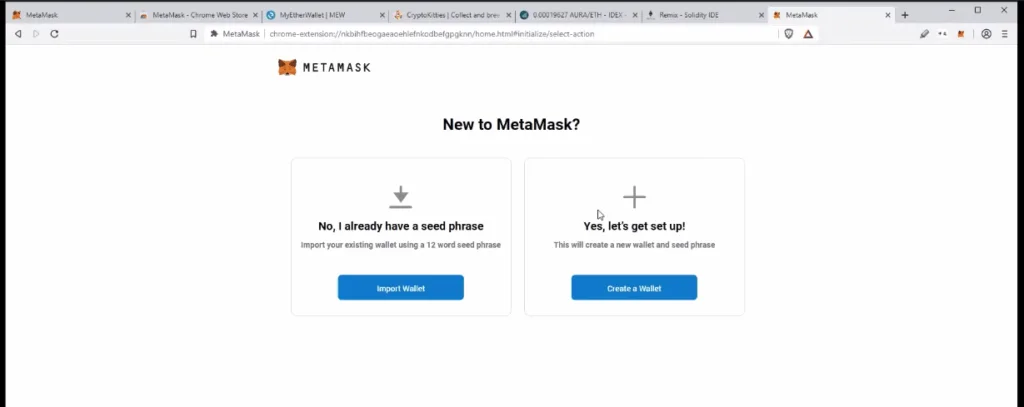
Create a new wallet
Click the “Get Started” button on the webpage and choose the option to make a new wallet when prompted. Afterward, you will be asked to choose your preferred security method:
- Secret Recovery Phrase (SRP): The classic method using a 12-word phrase. You alone control access.
- Social Login (Extension only): Link your Google or Apple account and set a password. Both are required to access your wallet.
Set a strong password using a unique combination of letters, numbers and symbols. Avoid predictable passwords like birthdays. If you are using SRP, write down the 12-word phrase and store it in a secure, offline location.
How to send crypto from MetaMask?
Sending crypto from MetaMask is a straightforward process whether you’re using the browser extension or the mobile app. Here’s how:
On browser extension
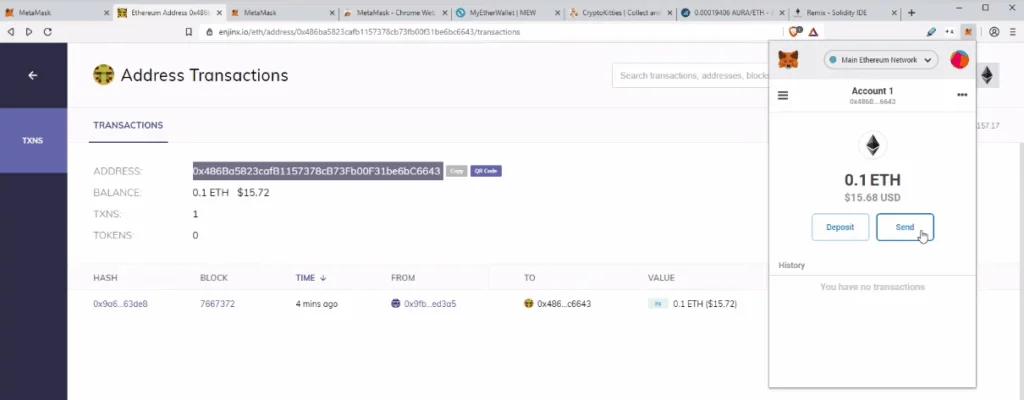
- Open MetaMask: Click the MetaMask icon in your browser.
- Select the Account: Make sure you’re in the correct wallet account.
- Click “Send”: This opens the transaction window.
- Enter Recipient Address: Paste the wallet address you want to send to. You can also select from saved contacts.
- Choose Token and Amount: Select the token (e.g., ETH, USDC, etc.). Then enter the amount to send.
- Review Gas Fees: MetaMask will estimate the gas fee. You can adjust the fee manually for faster or cheaper transactions.
- Confirm Details: Double-check the recipient address, token type, and network. Click “Confirm” to send.
- Track Transaction: Go to the Activity tab to monitor status. You will see a “Confirmed Transaction” notification once complete.
On mobile app
Here is how to send crypto from MetaMask using the mobile app:
- Tap the Actions button in the center of the tab bar.
- Tap “Send”.
- Paste or select the recipient address.
- Choose the token and enter the amount.
- Tap “Next” to view gas fees and transaction details.
- Tap “Send” to confirm and complete the transaction.
Important notes
- Gas Fees: Ensure you have enough of the network’s native token (e.g., ETH for Ethereum, BNB for BSC, POL for Polygon) to cover gas fees.
- Network Match: Always verify that the sending and receiving wallets are on the same blockchain network.
- Security Tip: Double-check the recipient address to avoid irreversible mistakes.
Change and add networks in MetaMask
MetaMask supports multiple blockchain networks beyond Ethereum, including Layer 2s and non-EVM chains. You can easily switch between networks or add new ones manually or via trusted platforms.
Switching networks
- Open MetaMask (browser extension or mobile app).
- Click the network dropdown at the top of the wallet.
- Select from preloaded networks like: Ethereum Mainnet, Polygon, Arbitrum, Optimism, BNB Smart Chain or Linea.
- MetaMask will automatically switch to the selected network.

Adding a new network
For some newer or testnet networks, you may have to add them to MetaMask manually or via trusted services like Chainlist.
Option 1: Manual add
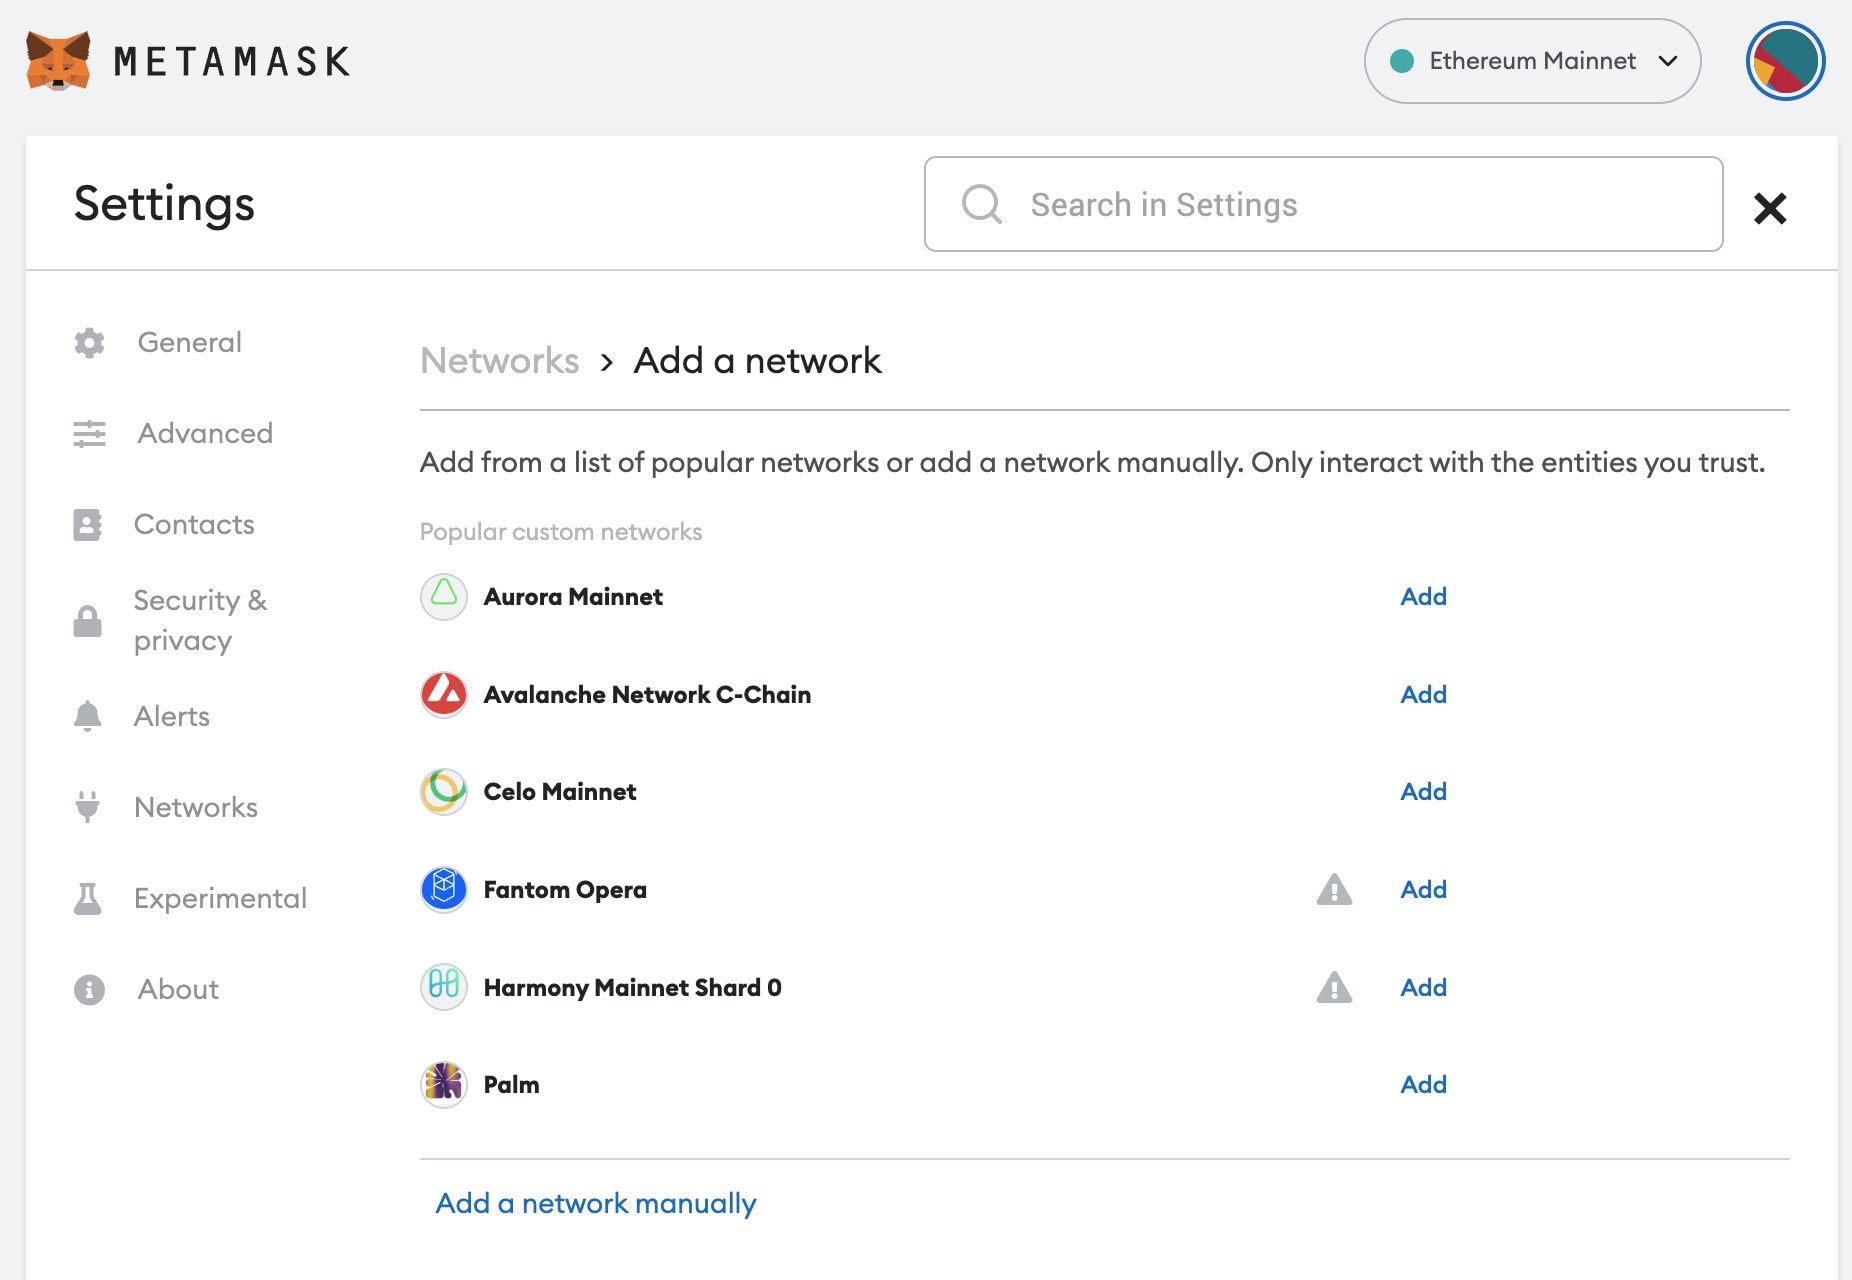
- Go to Settings > Networks > Add Network.
- Enter the required details: (1) Network Name; (2) RPC URL; (3) Chain ID; (4) Currency Symbol; (5) Bock Explorer URL (optional)
- Click Save to add the network.
Option 2: Adding a network using Chainlist
- Visit Chainlist.org.
- Connect your MetaMask wallet.
- Search for the desired network (e.g., Avalanche, Base, zkSync).
- Click “Add to MetaMask”, then approve and switch.
Tips and reminders
- Verify RPC Details: Always get network info from the official project documentation.
- Custom Networks: These are not verified by MetaMask. Be cautious of phishing or fake RPCs.
- Testnets: Enable testnets via Settings > Advanced > Show test networks.
- Non-EVM Chains: MetaMask now supports limited functionality for non-EVM chains like Bitcoin and Starknet.
How to use MyEtherWallet with MetaMask?
MyEtherWallet(MEW) is a free, open-source interface for interacting with the Ethereum blockchain. You can connect your MetaMask wallet to MEW to manage assets, interact with smart contracts, and access advanced features. Here is how to use MyEtherWallet with MetaMask:
- Open MyEtherWallet: Go to the official MEW website. Always verify the URL to avoid phishing scams.
- Access Your Wallet via Browser Extension: Click “Access My Wallet” on the homepage. Select “Browser Extension” as your access method.
- Connect MetaMask: MetaMask will prompt you to select a wallet account. Click “Next”, then “Connect” to authorize MEW.
- View MEW Dashboard Once connected, you’ll be redirected to the MEW dashboard where you can: (1)View your portfolio and balances; (2) Send and receive ETH and ERC-20 tokens; (3)Manage NFTs; (4) Interact with smart contracts; (5) Sign messages and transactions.
- Switch Networks if Needed Ensure your MetaMask is on the same network MEW is using (e.g., Ethereum Mainnet, Arbitrum, Optimism). You can change networks directly in MetaMask’s dropdown menu.
Disconnecting MetaMask from MEW
If you want to disconnect MetaMask from MEW:
- Open MetaMask.
- Click the three dots in the top right corner.
- Go to “Connected Sites”.
- Find MEW and click “Disconnect”.
MetaMask Fiat On-Ramps: Buy Crypto Using Debit or Credit Cards!
MetaMask now offers a seamless way to purchase cryptocurrencies directly within the wallet using fiat payment methods. Through integrations with trusted providers like Transak, MoonPay, Coinbase Pay, and others, users can buy crypto using:
- Debit or credit cards
- Apple Pay and Google Pay
- Bank transfers (in supported regions)
How to buy crypto in MetaMask
- Open MetaMask (browser extension or mobile app).
- Click the “Buy” button on the home screen.
- Choose a provider (e.g., Transak, MoonPay, Coinbase Pay).
- Select: (1) The cryptocurrency you want to buy (e.g., ETH, USDC, SOL); (2) The amount; and(3) Your preferred payment method
- Follow the prompts to complete identity verification (KYC), if required.
- Confirm the transaction and wait for the crypto to appear in your wallet.
Expanded network support
As of July 2025, MetaMask supports fiat purchases on non-EVM chains like Solana, allowing users to buy SOL directly in-wallet via Transak. This marks a major step toward chain-agnostic onboarding.
Security and compliance
- All fiat on-ramp providers integrated with MetaMask comply with local regulations and offer tiered KYC processes.
- MetaMask does not store payment information; transactions are handled by the selected provider.
Tips for smooth transactions
- Ensure your wallet is on the correct network before purchasing.
- Use a verified provider to avoid phishing risks.
- Check fees and exchange rates across providers for the best deal.
How to withdraw money or cryptocurrencies from MetaMask
Withdrawing funds from MetaMask involves either converting crypto to fiat directly within MetaMask or transferring assets to a centralized exchange for cash-out. The method you choose depends on your location and the supported features in your region.
Option 1: Direct Fiat Withdrawal Using MetaMask’s Sell Feature
MetaMask now offers a built-in “Sell” feature that allows users to convert crypto to fiat and withdraw to a bank account or PayPal. This feature is available in select regions including the United States, United Kingdom, Germany, France, India, and Saudi Arabia.
- Steps:Go to MetaMask Portfolio and connect your wallet.
- Click on “Sell” in the left-hand menu.
- Select your region and the token you want to sell (currently ETH on Ethereum Mainnet is supported).
- Choose your destination account (bank or PayPal).
- Enter the amount to sell and select a quote from available providers.
- Link your fiat account on the provider’s site.
- Confirm the transaction and send your crypto.
- Track the transaction in the Sell tab. Fiat may take a few days to arrive.
Option 2: Withdraw via centralised exchange
If the Sell feature is not available in your region, you can withdraw by transferring your crypto to an exchange like Binance or Coinbase:
- Create and verify an account on a trusted exchange.
- In MetaMask, swap your tokens to a widely supported asset like ETH or USDT.
- Copy your deposit address from the exchange and paste it into MetaMask’s “Send” field.
- Confirm the transaction and wait for the funds to arrive in your exchange wallet.
- On the exchange, sell your crypto for fiat.
- Withdraw fiat to your bank account or PayPal using the exchange’s withdrawal options.
Points to note
- Always verify the network and token compatibility before sending.
- Ensure you have enough native tokens (e.g., ETH) to cover gas fees.
- Use only official exchange platforms to avoid scams.
- MetaMask does not directly connect to banks; all fiat withdrawals are processed through third-party providers or exchanges.
How to collect airdrops using MetaMask?
MetaMask is frequently used to claim airdrops from decentralized projects. Airdrops are free token distributions to users who meet certain criteria, such as holding a specific token, completing tasks, or interacting with a protocol. MetaMask’s growing ecosystem now includes structured campaigns like MetaMask Missions, which may increase eligibility for future airdrops.
To collect airdrops using MetaMask:
- Visit the official airdrop or project website. Always verify the URL to avoid phishing scams.
- Switch to the correct blockchain network in MetaMask. Many airdrops are network-specific (e.g., Ethereum, Linea, Arbitrum).
- Connect your MetaMask wallet to the site. Use the “Connect Wallet” button, typically located in the top right corner.
- Complete any required tasks. These may include swaps, bridging tokens, staking, or minting NFTs.
- Click the “Claim” button if available. MetaMask will prompt you to approve the transaction and pay any gas fees.
- Confirm the transaction. Once approved, the tokens will appear in your wallet.
- Disconnect your wallet from the site after claiming. In MetaMask, go to “Connected Sites” and remove access.
To increase your chances of receiving future airdrops:
- Actively use MetaMask’s built-in features such as swaps, bridges, and staking.
- Participate in campaigns like MetaMask Missions, which run periodically and reward users for completing on-chain tasks.
- Hold eligible tokens and interact with new protocols early.
MetaMask does not guarantee airdrops, but consistent engagement with decentralized applications and networks through MetaMask may improve your eligibility.
Cash out your crypto to fiat using MetaMask
MetaMask now offers a built-in “Sell” feature that allows users to convert supported cryptocurrencies into fiat currencies and withdraw funds directly to a bank account or PayPal. This feature is available through integrated off-ramp providers such as MoonPay and Transak.
To cash out using MetaMask:
- Open MetaMask Portfolio at portfolio.metamask.io or use the MetaMask mobile app.
- Select the “Sell” option from the menu.
- If it is your first time, choose your region and confirm that the service is supported in your location. The feature is currently available in the United States, United Kingdom, and parts of Europe.
- Choose the token you want to sell, such as ETH or supported stablecoins.
- Enter the amount to sell and select a quote from the available providers.
- You will be redirected to the provider’s website to complete identity verification and link your bank or PayPal account.
- Return to MetaMask Portfolio and confirm the transaction.
- Track the progress in the “Sell” tab. Fiat withdrawals may take a few business days to complete.
Points to note:
- Only supported tokens with sufficient liquidity can be sold. Airdropped or obscure tokens may not be eligible.
- MetaMask does not store personal banking information; all fiat processing is handled by third-party providers.
- If your region is not supported, you can transfer your crypto to a centralized exchange like Binance or Coinbase to cash out.
MetaMask tips, tricks, and hacks for ADVANCED users
Congratulations on setting up your account! Now you are ready for ADVANCED tips and tricks such as:
- How to reduce transaction fees;
- how to cancel incorrect transactions;
- how to use your Ledger cryptocurrency hardware wallet with MetaMask;
- how to save your frequently used contacts (addresses) to MetaMask;
- how to speed up stuck transactions….and more!
Check out our video which will walk you through the process step by step:
Frequently Asked Questions (FAQs)
Yes. It’s simple to use and ideal for newcomers.
Yes, if you protect your Secret Recovery Phrase and avoid phishing sites.
Yes. Import your wallet using your recovery phrase.
No, but having tokens unlocks full features.
Buy via fiat on-ramps or receive from another wallet.
Click “Send,” enter the address, choose the token, and confirm.
Use the “Sell” feature to withdraw to bank or PayPal in supported regions.
Fake sites and messages asking for your recovery phrase.
Yes, for large or long-term holdings. For hardware wallet recommendations, check out our review for the Ledger Nano X and the Trezor Safe 5
Use “Speed Up” or “Cancel” options in MetaMask.
Yes. Download from the App Store or Google Play.
Click “Connect Wallet” and approve the prompt in MetaMask.
Disclaimer: Cryptocurrency trading involves significant risks and may result in the loss of your capital. You should carefully consider whether trading cryptocurrencies is right for you in light of your financial condition and ability to bear financial risks. Cryptocurrency prices are highly volatile and can fluctuate widely in a short period of time. As such, trading cryptocurrencies may not be suitable for everyone. Additionally, storing cryptocurrencies on a centralized exchange carries inherent risks, including the potential for loss due to hacking, exchange collapse, or other security breaches. We strongly advise that you seek independent professional advice before engaging in any cryptocurrency trading activities and carefully consider the security measures in place when choosing or storing your cryptocurrencies on a cryptocurrency exchange.

Angela Wang
Angela loves cryptocurrency, technology that improves our lives...and food. Anything that merges these worlds together is even better.